
I really hope you enjoy this Butteriest Scrumptious Butter Chicken Biryani recipe. If you do, please let me know in the comments below. I LOVE reading your comments ❤
WHY YOU WILL LOVE THIS RECIPE
There’s butter chicken. Creamy, buttery, lush…
And then there’s biryani. Flavorful, rich, fragrant…
Now imagine getting them together.
And there you have it, one of the most delicious dishes in the whole world.
BUTTER CHICKEN BIRYANI ❤.
I don’t know if you’ve heard of this dish before but oh man, it’s one of the most delicious things EVER.
Biryani and butter chicken? I mean, who would’ve thought?
These are two of the most beloved Indian dishes out there and mixing them together ended up in me creating one of the best dishes I’ve tried to cook, ever…
Imagine biryani. Aromatic, rich rice coated in ghee and fragrant spices…
And then imagine spreading some butter chicken over it… creamy, silky, buttery butter chicken…
And now, imagine covering it all with another layer of rice and then pouring some saffron milk and ghee over it along with some fried onions…
And then adding another layer of butter chicken and biryani rice, then covering all of it and leaving it to cook for some time… allowing all those flavors to mix together and get absorbed in each other.
Those succulent butter chicken flavors melt and get absorbed into the rice, giving the best butter chicken biryani ever!
Everything just works so wonderfully together.
How can something taste this good?!
And the most amazing part? This entire dish is cooked in one pot. How awesomesauce is that now, huh?!
This recipe may require a little extra prep and may take a little more time to cook but it’s worth every second spent cooking it!
But hey, do you need a few more reasons to understand why you’ll love this delicious and easy butter chicken biryani to buttery bits and pieces? Let’s go!
- Do you love biryani? Or butter chicken? Or both? If you do, you NEED to try this incredible combination right now! What can be better than mixing two of your favorite dishes together?
- And if you’re new to Indian food, go ahead and try this recipe! You’ll love it! It’s a perfect beginner Indian dish because it’s filled with all these amazing flavors that aren’t incredibly overwhelming but are just right and taste sooo good!
- And if you’re new to cooking Indian food or cooking in general, this recipe may not be the quickest one out there and there are a few steps involved too BUT I’ve made it super simple for you guys to follow, as always ❤. I always make sure I explain every single thing in detail in every single recipe for all the beginners out there so it’s as simple and clear for you guys as possible! I’ve always got your back. Always.
- Oh and do I need to mention how delicious, wholesome and filling this amazing rice meal is? It’s absolute comfort food and fills up your tummy and heart too with all that goodness, leaving you full for a really long time. It’s one of the best main dishes ever!
- Also, I know there are quite a few ingredients used in this recipe but hey, I’ve made sure these ingredients are easy to find. So no worries there at all. You can always check your local Indian grocery store too to find difficult-to-find ingredients!
- This easy butter chicken biryani recipe is cooked entirely in ONE POT! And oh my goodness, how cool is that? The fried onions, chicken, butter chicken sauce AND rice! There are quite a few steps, yes, but things get so much easier when all of it is just in a single pot!
- In this recipe, you will be cooking every single thing from scratch. It is fresh ingredients mixing in together to their maximum delicious potential. I knew I wanted to cook this recipe in a way that didn’t skip out on any steps (unless they were absolutely unnecessary). I’ve done the same thing with the biryani rice and the whole biryani assembling process as well. If you enjoy cooking, you’ll LOVE cooking this recipe to bits and pieces and if you don’t enjoy cooking, you may just end up falling in love with it still. This is a whole new way and process of cooking food and it’s fascinating to experience, learn and understand all of it.
- And come on, you guys! Buttery, rich, sumptuous, buttery, silky, smooth, buttery, slightly tangy slightly sweet, buttery, delicious… wait, did I mention buttery (!) butter chicken slowly cooked over fire, layered over some biryani rice… with some ghee and saffron milk drizzled on top along with a generous garnishing of fried onions? How can you resist this?… No one can say no to this dish. NO ONE! The mere thought of it is enough to make anyone hungry 😍!
- Is your diet preference vegetarian, dairy-free, gluten-free, nut-free or vegan? You can still make this delicious buttery biryani! Check out our Variations Section below to see how you can make this recipe according to your diet preference!
Man oh man, one-pot meals are the BEST, right? Would you like to explore more such recipes? Check out our collection of absolutely lip-smacking One-Pot, Stovetop and Winter recipes.

WHAT EVEN IS Butteriest Scrumptious Butter Chicken Biryani?
So, what is butter chicken biryani? What even is it? What the heck is this dish that sounds like it has come from a gorgeous magical world?!
Let me explain this amazing rice dish to you. It’s one of those dishes you just know will be a masterpiece while you cook it.
I KNOW I’m going on and on about it, I know!!! But that’s how amazing it is.
And you need to try it to know how awesomesauce it is. Words don’t do it any justice, trust me.
But let me try…
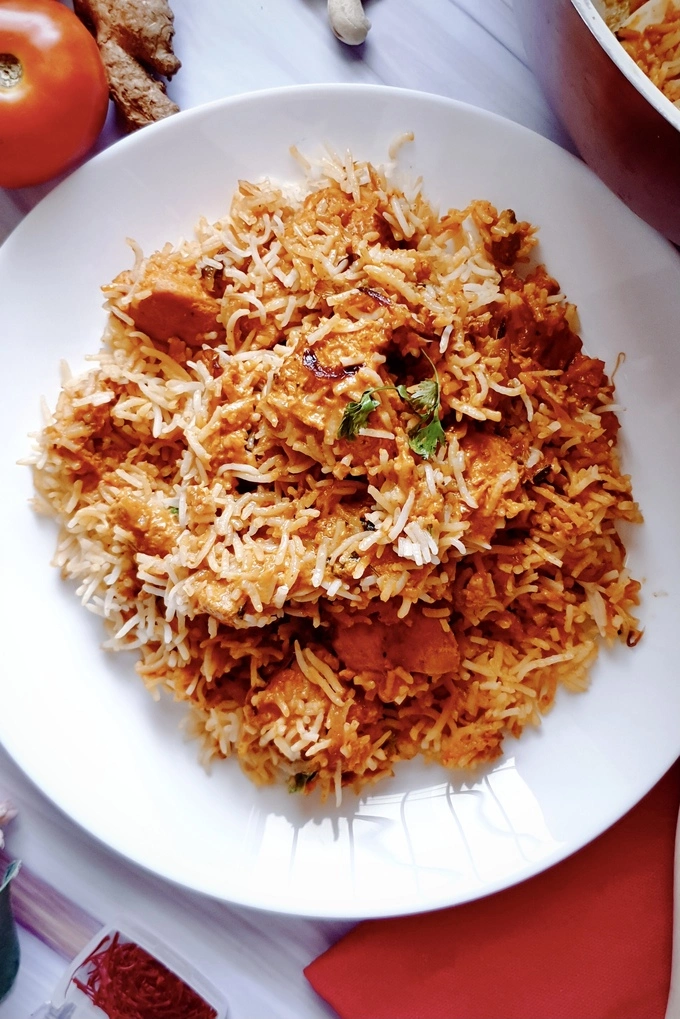
Butteriest scrumptious butter chicken biryani is basically incredibly buttery, delicious butter chicken spread in between layers of lightly spiced aromatic biryani rice and topped with creamy saffron milk, rich ghee, fresh cilantro leaves and fragrant fried onions in between each layer.
When you think of biryani, you think of cooked flavorful meat in between layers of rice. Now just think of butter chicken filling up that space instead and there you have it, butter chicken biryani!
And oh man, it tastes enchanting 💖…
Here are the steps involved in cooking this dish:
- Marinate the chicken
- Fry the onions
- Cook the chicken
- Make the base of the butter chicken curry
- Finish cooking the butter chicken curry
- Cook the biryani rice
- Assemble the butter chicken biryani
- The *dum* process
Sounds like a lot but it isn’t ❤ AND when it results in something as scrumptious as this? It’s worth it!
Butter chicken biryani on its own is a pretty recent dish.
I’m not sure if there’s any history behind it and researching on it gave me no results!
People have cooked it though so maybe it was just created by someone who thought it’d be a good idea to mix both of them. Something similar happened with me too and I’ll speak more about it below.
But hey, we can always try and understand a little history behind butter chicken and biryani on their own to get to know the dishes we’re mixing together.
I won’t delve into much detail here, just the basics.
Biryani is a dish that consists of multiple layers of rice and meat, topped with fried onions, ghee and saffron milk. The meat differs but the most commonly used meat is mutton and then chicken.
Prawn biryani and fish biryani are also made.
It is sometimes said that the word “biryani” originated from the Persian word birinj which means “rice”.
It is also said that it may have originated from the word beriyan which means “to fry or roast”.
It’s not sure where the dish originated.
There are loads of theories out there. Some say the dish originated in Hyderabad, India. Hyderabadi biryani is incredibly famous out there in the world (and it’s DELISH too!)!
Another theory says that biryani developed in the kitchens of the Mughal royals.
And yet another theory states that the Mughals brought this dish to India and it originally was created and developed in Persia.
There are lots more theories out there but we have a biryani to cook so let’s keep that for another day 💃🏻!
Coming to butter chicken…
Butter chicken is a pretty recent dish and it has got an incredibly interesting story behind it.
Apparently, in a restaurant in Delhi, India, there was some leftover tandoori chicken.
The chef didn’t know how to make it soft, tender and juicy again because popping it back into the tandoor (a cylindrical clay or metal oven) would dry it all the more.
So he made a lush sauce of tomatoes, spices and loads of butter.
He added the leftover tandoori chicken to this buttery sauce and got the most amazing curry in the whooooole world! Thank you, chef!
And that curry is one of the most loved Indian curries in the whole world today, butter chicken 🤩!
Now, coming to how I came up with this recipe and my memories around it… Personal history and memories time, because that’s what The Buttery Fairytale is all about ❤.
You can share your stories with this recipe in the comments below too whether this is the first time you’re trying this recipe or if you’ve already had it multiple times before, I would love to hear all about it!
I was interning for a law firm while I was in law school and there was an AMAZING place that would sell these butter chicken rice bowls.
I would look forward to lunch every single day in that incredibly dreary workplace just to get my hands on that butter chicken rice bowl!
The rice in that rice bowl was very lightly spiced. It wasn’t biryani rice but was something really close…
I got done with that internship in a few months but the memories of that yum butter chicken rice bowl always stayed!
I went again some time later but I guess the chef changed or something because it just didn’t taste the same.
Boy was I disappointed.
I got married a few years later to Zee and kept telling him how awesomesauce that butter chicken rice bowl was. I would miss it all the time.
And then I thought why don’t I just go make it myself?!
So it began… The long but delicious journey of putting this recipe together.
It wasn’t easy finding the right butter chicken recipe!
My mom and grandmom have the most delish butter chicken recipes in the whole world but they didn’t taste like the one I had with the rice during my internship. I had to get that taste!
So I took both mom’s and grandmom’s recipes and added my own tiny processes, tweaked the recipes a little and worked super hard until I just knew I had the ONE! The one that would taste incredible with the lightly spiced rice I had in mind.
It wasn’t easy but I got there.
And then I thought of the rice.
I remembered the rice being lightly spiced, a little like biryani rice.
It then got me thinking how awesome biryani rice would taste with butter chicken.
But then I was like, wait a minute, let me just go ahead and make a whole biryani out of this butter chicken and rice dish!
And then THIS BEAUTIFUL magnificent lil’ guy (dish!) was born!
I love biryani to bits and pieces and the entire process around it makes you feel like royalty with all that saffron, milk, fried onions… ghee… You just know you’re cooking something gorgeous.
It’s just super awesome coming up with a butter chicken biryani variation for the butter chicken AND biryani lover in me.
I remember the first time I tried this dish… I just knew it was even better than the one I had during my internship days.
And Zee? Well, he went crazy about it. For the longest time, this was something we were cooking ALMOST every single day at home.
And it’s a bit of a long dish to cook, takes some time, so you can imagine our passion and love for it because we were cooking it literally every day.
This is one of those “Special Days” recipes too! Days when there’s a party at home, or someone’s birthday… It tastes absolutely incredible and gets that OH MY GOODNESS reaction from people!
I’ve also had this dish on days I felt exhausted and just needed comfort. This butter chicken biryani tastes amazing when it’s all cold and rainy outside and you’re at home, cozied up under a blanket…
This is the best butter chicken biryani recipe ever ✨!
I love this butter chicken recipe. You can call it the star of the show here.
The rice is delish and the entire process of making it a biryani is important too BUT if the butter chicken recipe isn’t the right one, the dish won’t taste as good as it should. It has to be just right.
And this recipe IS just right ❤!
I can call the butter chicken here an authentic butter chicken recipe because it involves most of the processes (minus the day-old tandoori chicken, we’re making our own here) traditionally involved in making a butter chicken curry.
This butter chicken recipe was given to me by my mom and grandmom and they didn’t have the same recipe because my mom changed the recipe in her own little way.
And then I changed the recipe they gave to me in my own way too.
Gosh, food and passing down recipes is absolutely beautiful. There’s just so much history!
I really hope you enjoy this recipe and fall deeply in love with it too. I hope you make the best memories ever with it… Trust me, it’s just that special and I’m so glad to share it with all of you.
Now go and make this butter chicken biryani and cook up your own Buttery Fairytale (see what I did there 😉?).
INGREDIENTS & SUBSTITUTIONS FOR THE Butteriest Scrumptious Butter Chicken Biryani
For exact ingredient measurements, please scroll down to the Recipe Card.
I’ve divided the ingredients used based on the steps involved in creating this magnificent recipe.
SO. GOOD.
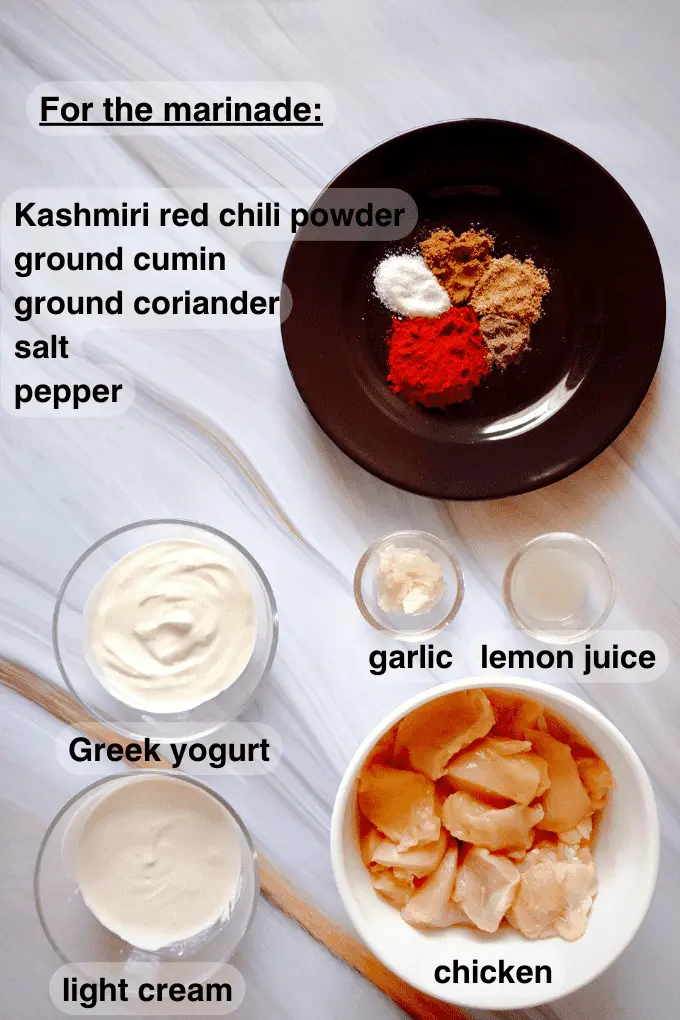
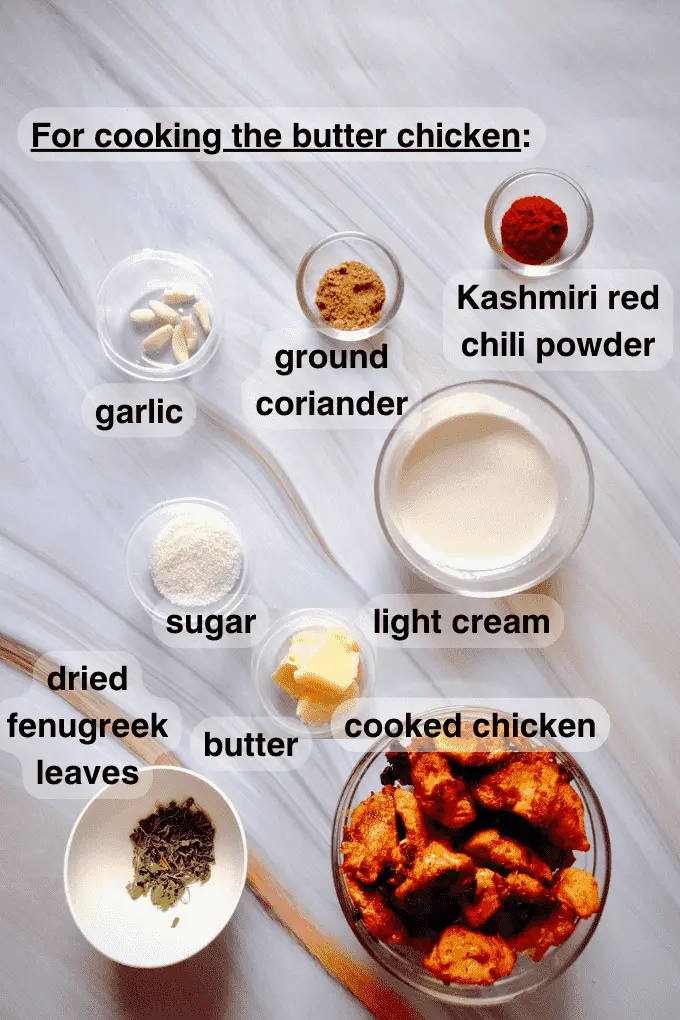
1) To marinate the chicken:
Butter chicken has changed so much over the years and there are loads of variations out there today.
Traditionally, the chicken in butter chicken is taken and shredded from leftover tandoori bone-in chicken that was cooked much earlier so the meat doesn’t go to waste.
You can do that here in this recipe too if you have some tandoori chicken on hand.
But it’s really not practical to have cooked tandoori chicken at home all the time and I don’t think many of us have a tandoor (a cylindrical clay or metal oven) at home to make tandoori chicken either!
So I’ve gone ahead and given our chicken a marinade that’s close to the marinade used to make tandoori chicken.
And oh man, this is one of the best marinades ever 😍!
- Chicken– I’ve used boneless chicken breasts here. I’ve just really warmed up to boneless breasts being used in butter chicken because I’ve grown up eating it like that at home and at restaurants too (most of the time)! Those breasts cut into fat cubes absorb that buttery flavor really well and get so juicy and succulent. You can use boneless thighs and bone-in meat too, if you prefer.
- Garlic paste– Go ahead and make a smooth paste out of your garlic cloves. Delicious garlic paste absorbs really well into the chicken cubes and forms a garlickiness that just works amazingly with the rest of the ingredients in this marinade.
- Greek yogurt– One of the main bases for our marinade, Greek yogurt makes our chicken juicy, tender and flavorful. It works incredibly with the rest of the ingredients in the marinade and brings everything together so well! You can substitute with plain yogurt here but make sure you strain it so it’s not really thin and runny in the marinade.
- Light cream or heavy cream– I LOVE adding cream to the chicken here. This is the other main base for this marinade. It makes our chicken soft and adds an *almost* creamy creaminess to it that tastes magical ❤. It works so well here and THIS little guy may make you gobble up the cooked chicken even before it reaches the butter chicken sauce. That’s how big of a change this ingredient brings to the marinade. I’ve used light cream (25% fat) here but as a substitute you can use heavy cream too, if you prefer!
- Kashmiri red chili powder– We want our chicken to be a gorgeous deep reddish brown and what can be better than Kashmiri red chili powder to achieve that? Kashmiri red chili powder gives our chicken that characteristic beautiful red color and also such a deep delish taste. Best part? It’s not very spicy at all! I’ve used a brand called Everest here, and the name of the product is Everest Kashmirilal. There may be other brands selling this spice, and you can use any of them too. Please try and use this spice ONLY but if you really can’t find it, a substitute may either be smoked or regular paprika. You can add in just a little cayenne pepper to the paprika for a little spice. You won’t get the same flavor or color you’ll get from Kashmiri red chili powder though.
- Ground coriander– Ground coriander gives our chicken a wonderful earthy taste. It also works really well with all the other ingredients here to make our chicken taste absolutely incredible. The right amount is really important because if you go a little overboard with ground coriander or even ground cumin, the taste of these spices may overpower everything else, so be careful!
- Ground cumin– Cumin is one of the most used Indian spices out there. It’s a warm spice and adds a hearty, rich touch to our chicken. It also adds just a little smokiness. Once again, the right amount is really important because if you go a little overboard with ground cumin or ground coriander, the taste of these spices may overpower everything else, so be super careful!
- Lemon juice– Lemon juice also makes the chicken tender, juicy and succulent. It gives the chicken this delicious tanginess too. You can substitute with lime juice here.
- Salt and black pepper– Absolute essentials here, as usual! You may adjust these two according to your taste and preference.
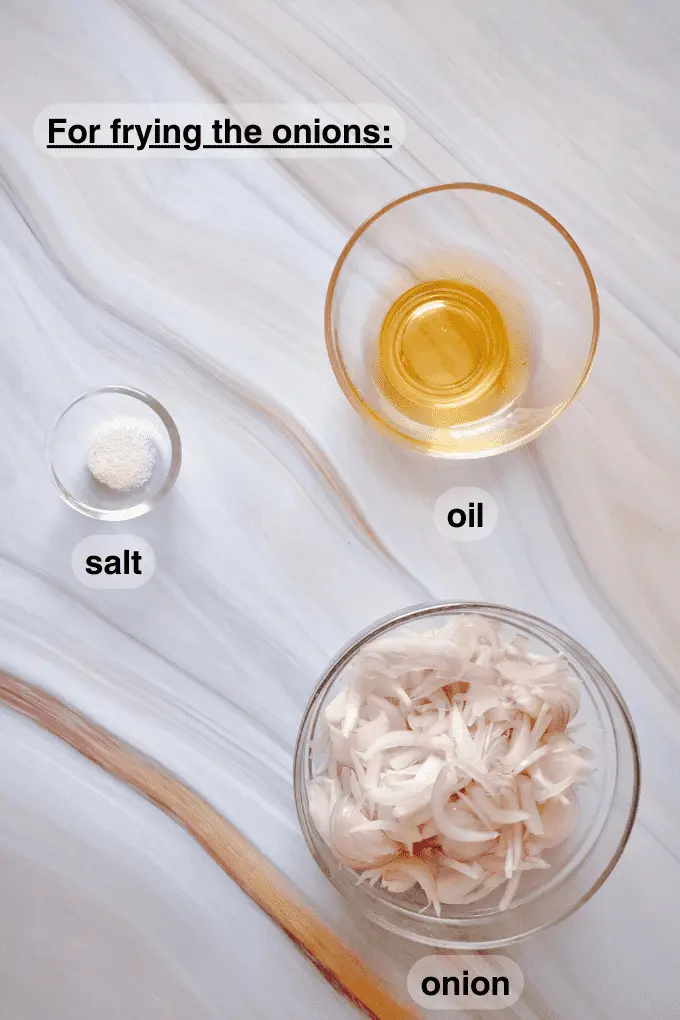
2) To fry the onions (also called birista):
- Cooking oil– A neutral, high-heat cooking oil should be used here. Keep in mind that this oil will go a pretty long way because we’ll fry our onions in it, cook our chicken in it, cook the butter chicken curry in whatever onion oil is remaining and then make our rice in it too. The oniony flavor your oil will get once you fry the onions in it will be ❤ and that will be our base oil for the rest of the recipe. Don’t worry though, we will keep adding oil and butter as we go but this oil right here is the main guy.
- Onion– You can use any type of onion here. I’ve used red onions. The onions need to be sliced thinly and uniformly for even frying. Please keep in mind though that the onions should be thinly sliced but should not be reallyyy thin at the same time. That’s because we don’t want them to get really crispy. We want them to retain that deep delicious rich oniony flavor because oh my goodness it’ll taste amazing in our butter chicken biryani. You can check the pictures under the Instructions Section below to understand better! You can also really thinly slice them and deep fry them for extra crispy onions if you prefer that in your biryani.
- Salt– Sprinkling just a pinch of salt over your onions while they sizzle in the oil brings out the moisture in them. This leads to quick and even browning. It also leads to a richer taste in your fried onions. Delish!

3) To cook the chicken:
- Onion oil– This is the onion oil from the previous step. The depth and flavor onion oil gives our chicken is incredible!
- Butter– It’s not called butter chicken for nothing. The butteriness begins here ⭐! Go wild with the butter if you wish. It works sooo well with that amazing garlicky marinade, you’re gonna want more and more!
- Marinated chicken– Oh that amazing chicken all nice, juicy and marinated. It’s time to cook it!
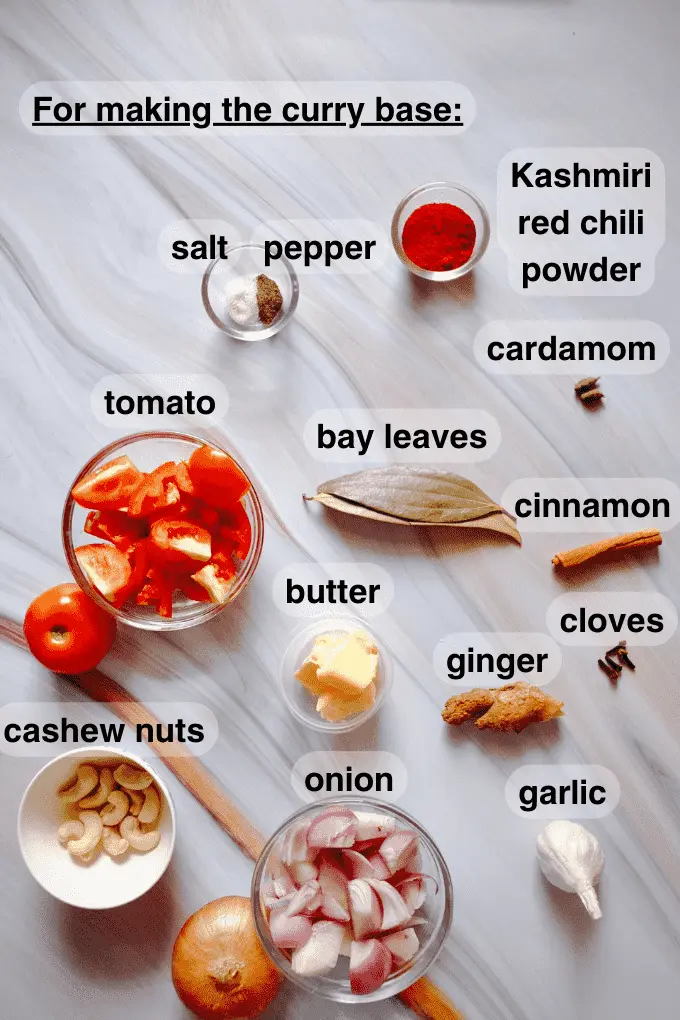
4) To make the base of the butter chicken curry:
- Onions– Onions form the main base of our curry, alongside tomatoes. After all, butter chicken originated when a chef added tandoori chicken to an onions and tomatoes curry!
- Cashew nuts– Mmm! Adding richness upon richness and then some more! Cashews make our butter chicken curry creamy and sooo good. They work incredibly well in the butter chicken curry to give us the most sumptuous sauce ever.
- Tomatoes– Tomatoes are the literal heroes of this dish. They give our curry that characteristic *just right* tanginess and red color (the Kashmiri red chili powder helps too, of course). Butter chicken almost always means the presence of tomatoes unless it’s a different type of butter chicken!
- Ginger– Delicious raw ginger gives that perfect gingery taste to our butter chicken sauce! You don’t need to grate, chop or mince the ginger here before adding it. Just peel it and add in the required amount of ginger as it is.
- Garlic– We add just a little garlic so there’s a slight garlickiness in the background of our butter chicken curry but it’s not out and out garlicky like in the face garlicky. Same thing goes for the ginger too! We want our ginger and garlic to be in the background of the curry but not dominate it.
- Kashmiri red chili powder– I love this spice to bits and pieces. And hey, it’s super important here too. THIS particular spice along with the tomatoes, gives our butter chicken that gorgeous reddish color (which turns to an orangish-reddish color once we pour in the cream). It also gives our butter chicken curry a deep rich taste and very very veryyy slight spice. I’ve used a brand called Everest here, and the name of the product is Everest Kashmirilal. There may be other brands selling this spice, and you can use any of them too. Please try and use this spice ONLY but if you really can’t find it, a substitute may be either smoked or regular paprika. You can add in just a little cayenne pepper to the paprika for a little spice. You won’t get the same COLOR and flavor you’ll get from Kashmiri red chili powder though.
- Whole cloves, whole cinnamon, whole green cardamoms, bay leaves– This is the perfect blend of dry spices to use in our butter chicken curry. The beauty of these spices is that they balance each other out really well. The strong slightly spicy cloves are balanced out by the sweet warmth of cinnamon working alongside the citrusy minty green cardamoms and the three of them are enhanced by the delicate and mild bay leaves. You can substitute with ground versions of these spices but I prefer using whole versions of them because maybe it’s just a feeling? But I love the thought of those whole spices stewing with the butter, onions, tomatoes, garlic and ginger! Slowly letting all that goodness out…
- Butter– And more butter! We’re stewing all these ingredients along with some fat cubes of butter for an added rich rich rich indulgent buttery butter chicken and oh my goodness, I can’t anymore it just sounds incredibly 🤩… incredible.
- Salt and black pepper– Our essential guys right here. Not to be missed out on!
5) Finish cooking the butter chicken curry
- Butter– We add in a scrumptious fat block of butter here to cook the rest of our sauce in. Have you understood how crazy we are about butter yet?
- Garlic– We add in lightly smashed garlic cloves to our butter to get those amazing buttery garlic flavors out because they blend in super well with the onion and tomato sauce. The flavors are gorgeous and oh my goodness, what can get better than a little buttery garlicky-ness?
- Kashmiri red chili powder– Just a little Kashmiri red chili powder here gives an added deeper color and a rich smoky taste!
- Ground coriander– We also add some ground coriander here to the butter to get its warm earthy flavor and floral aroma out.
- Blended tomatoes and onions sauce (butter chicken sauce)– The silky blended sauce is then added to the butter, garlic, Kashmiri red chili powder and ground coriander. It will take in those extra flavors of all the spices and garlic cooked in butter 😍!
- The cooked chicken– We add the scrumptious chunks of chicken we cooked earlier to the buttery sauce in the pan. The cooked chicken will then absorb all those delicious deep rich flavors of the butter chicken sauce and the butter chicken sauce will in turn absorb all those scrumptious flavors of the chicken too. It’s a gorgeous mixture of flavors.
- Light cream or heavy cream– Our curry will probably be all nice and smooth already by now BUT adding in cream will make it richer, thicker and silkier. The end result? A beautiful deep orangish-reddish silky smooth, creamy, shiny butter chicken curry. I’ve used light cream with a fat percentage of 25%. You can use heavy cream too, if you prefer.
- Sugar- The secret to an absolutely delicious butter chicken is just a little sugar. It gives our butter chicken an amazing slightly sweet taste which makes it go from oh wow butter chicken to OUT OF THIS WORLD butter chicken. Sugar also helps balance the acidity from the tomatoes. You can substitute with some honey too here, if you prefer.
- Dried fenugreek leaves (also called Kasuri methi)– Fenugreek has a gorgeous strong earthy taste. Its flavor can’t really be explained in words and you need to try it to understand what it does to your butter chicken (and other Indian dishes). The first time I sprinkled some dry fenugreek leaves over one of my curries, I understood where restaurant curries get that taste from. Fenugreek makes a curry taste like it’s come from a restaurant (and a very good one at that). This is an optional step but please try finding dried fenugreek leaves if you can because they make a massive difference.
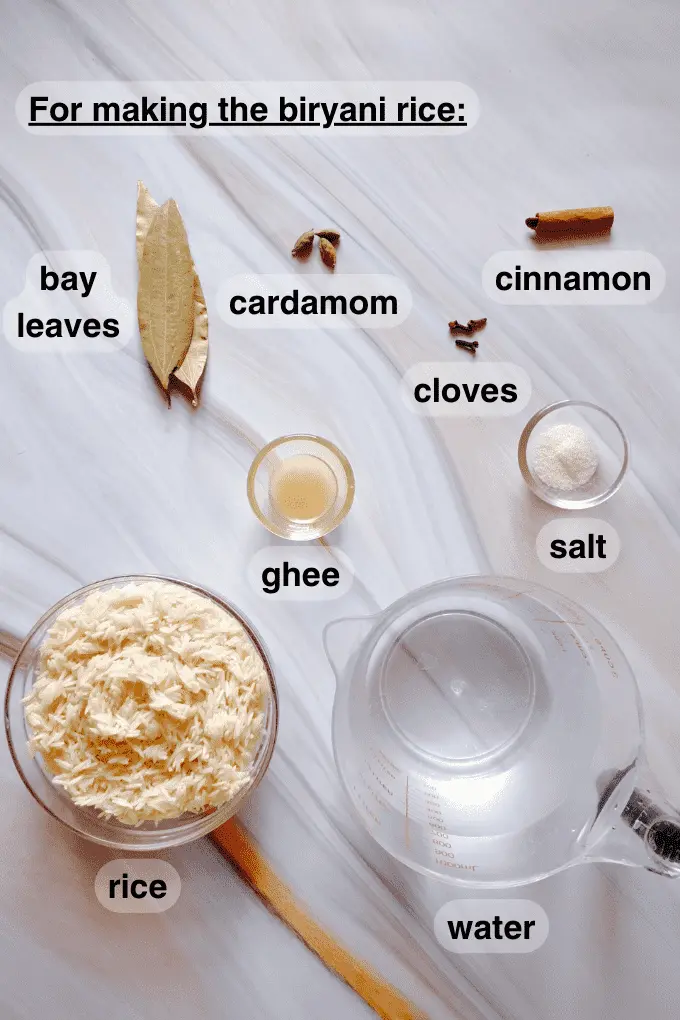
6) Cook the biryani rice:
- Water– Our rice will cook in water rich in spices. Cloves, green cardamoms, cinnamon and bay leaves will transform the water into the most beautiful, lightly spiced water ever!
- Ghee– Adding a little ghee to our water will help separate the rice grains quite a bit. It will also add a rich taste to the rice as it may absorb the rich ghee a bit as it cooks.
- Cloves, green cardamoms, cinnamon, bay leaves– This is an amazing mix of spices that work really well with rice to give us the richest, deepest, most aromatic biryani rice ever. Different biryani recipes may use different spices but these are the spices I’ve watched my family use to make our biryani rice all these years and the biryani rice has been amazing every single time ❤. You can use the powdered versions of these spices as well but I prefer using whole spices when cooking my biryani rice.
- Salt-Salt is an incredibly important ingredient in biryani. Don’t add in too much salt but don’t add in too little either. Give the water a taste after adding in the salt. It should taste just right.
- Basmati rice– The right kind of rice is incredibly important when you’re making biryani. I’ve used Basmati rice here and I suggest you use it too. Those beautiful long grains work incredibly well to give the best biryani, every single time. You can also use Sella Basmati rice. This is a good beginner-rice because it is tougher than Basmati rice and won’t mush easily if it’s overcooked. If you absolutely don’t have these two types of rice though, you can use Jasmine rice or any type of American long-grain rice as a substitute. You need to cook the rice until it’s 80 to 90% done. Every type and brand of rice has a different cooking time so you can follow the package instructions and just cook it a little less than the time given. You can also follow my instructions below alongside cooking according to the package instructions!

7) To assemble the biryani:
- Partially cooked rice– Our partially cooked rice will steam and cook completely in the dum process below. In this step, we lay the rice in layers and spread the butter chicken curry over each layer. These layers of rice will absorb all that delicious butter chicken curry and slightly cook a little more in it during the dum step. It’s a gorgeous process! Who even thought of biryani? What an amazing idea!
- Cooked butter chicken– We will be layering our juicy cubes of chicken and butter chicken curry over the biryani rice and forming layers over layers this way. That buttery butter chicken curry is gonna be absorbed by that flavorful rice, layer after layer, giving us the most indulgent dish ever ❤! The butter chicken curry will be absorbing those light spices from the biryani rice too to give us such a wholesome overall flavor!
- Ghee– Some ghee poured in after each layer over rice just adds to the richness of this dish.
- Fried onions– Those rich scrumptious fried onions we fried earlier will be coming in handy now! They need to be sprinkled alongside the ghee after each layer of rice.
- Saffron– Real saffron is the main thing here. Saffron gives our biryani a deep, rich touch and amazing aroma that I just can’t explain! It’s a major essential when cooking biryani and layering it. It also gives our rice the most gorgeous color. Authentic biryani almost always uses saffron for color. Here, our butter chicken is orangish-red so you may not notice the color of the rice grains as much but if you were to make biryani with the traditional brownish meat curry, you would notice a few grains being orangish. That, you guys, is saffron!
- Milk– Saffron needs to be soaked in hot milk for all its flavors to come out. This saffron milk is then drizzled in between each biryani layer alongside ghee and fried onions.
- Fresh cilantro– Cilantro leaves are the absolute best. We add them in between each layer along with the ghee, fried onions and saffron milk. They give our butter chicken biryani a fresh taste and help in balancing a bit of all that richness!
8) The Dum process:
- No ingredients needed here. Just let your butter chicken biryani cook over a low flame. It’s a waiting game so try and resist all that deliciousness for just a little longer!
Once again, for exact ingredient measurements, please scroll down to the Recipe Card.
Man oh man, one-pot meals are the BEST, right? Would you like to explore more such recipes? Check out our collection of absolutely lip-smacking Curries, Chicken & Meat and Party/Special Day recipes.
RECIPE & DIET VARIATIONS YOU CAN TRY
Butter chicken biryani is an incredible dish, yes.
But maybe you want to try something new with it?
Or maybe you have a different diet preference and want to know how you can cook this wonderful recipe according to your diet preference (for that, just check below the points under this section).
Or also, maybe you have a few questions that need answering, like, is so much butter REALLY that important in butter chicken?
Go ahead and read the variation suggestions given here and if you still have any questions, ask them in the comments below (or if you have any suggestions, let us know still!) ❤!
- I prefer my fried onions in biryani to be richer in taste than regular crispy deep-fried onions, so I cut them thin but not really thin and I don’t deep-fry them either. I sauté them until they reach a deep brown and smell absolutely delicious. The method I’ve given goes super well with biryani and keeps a deep oniony delish taste. If you prefer crispier onions though, slice your onions super thin and deep fry them.
- You can also use bone-in chicken or chicken thighs. You may need to cook them for a longer time though so cook it accordingly.
- Got some tandoori chicken from last night’s Indian takeout? Go ahead and use it in this butter chicken recipe instead of cooking your own chicken. Or maybe, just order some tandoori chicken in to see how it’ll taste with the butter chicken curry we’ve made in this recipe. Just take the meat out from the pieces of chicken and add it to the butter chicken curry. That will make for an interesting variation (but hey, our chicken recipe here is still incredibly delicious 😍).
- You can also cook your marinated chicken in a different way. You can grill it, bake it or even barbecue it before adding it to the prepared butter chicken sauce.
- You can use a different meat too, if you prefer. I know the dish is called butter chicken but trust me, different meats work really well here! You can use shrimp, fish or even lamb. Make sure you use the same marinade that we’ve given here for the chicken. The cooking time may vary depending on the meat used so cook accordingly.
- Another interesting thing you can do here is marinate your favorite veggie/veggies (such as potato or maybe even cauliflower) in the same marinade we’re using for the chicken. Use the same marinade but marinate your veggies in a separate bowl from the chicken. Then, go ahead and cook them before cooking the chicken and add them to the scrumptious tomato onion butter chicken sauce along with the chicken to have a delicious butter chicken and vegetable curry.
- I know it’s called butter chicken biryani but if you prefer, you CAN cut down on the butter. Try not to remove it completely, just use a little lesser butter than the amount I’ve asked you to use. It’ll still be yum!
- And if you’re in the mood for an indulgent meal, go ahead and add even more butter, if you prefer. It’ll just be butterier and even more fun!
- You can also skip on the cashew nuts if you don’t have any at home. Cashew nuts add a nice thickness to our butter chicken curry and give a gorgeous rich taste too. But if you don’t have any at home, don’t worry. Just skip out on them because the butter and cream will work their magic and give you a rich curry too!
- We add some sugar to our butter chicken at a point during the cooking process. You can add in some honey instead of sugar, if you prefer.
- I’ve used light cream with a fat percentage of 25% but you can use heavy cream for a richer, creamier taste!
- You can use cream with a lower fat percentage as well!
- I’ve given measurements in this recipe to make our butter chicken curry not really thick nor too runny so it can spread beautifully over the biryani rice. But hey, if you prefer a thinner butter chicken curry, just go ahead and add a little more water to it in the beginning when you’re making the base of the butter chicken curry (in Step 4).
- And if you prefer a thicker butter chicken curry, add in lesser water at the very beginning when you’re making the butter chicken curry base (in Step 4). You can also let the sauce evaporate a little more once you add it back to the Dutch oven after straining it in the next step (in Step 5) until it reaches your desired consistency.
- A different type of rice can be used too! In India, different regions make biryani using different types of rice and you can go ahead and experiment that way as well. I’ve grown up eating biryani made using Basmati rice so it’s a personal preference but that doesn’t mean other rice grains won’t work well. If you’ve tried a different rice grain and liked it, let me know in the comments below!
- Or hey, you can also use a different type of grain altogether. You can try using couscous to make a butter chicken couscous biryani or maybe even quinoa to make a butter chicken quinoa biryani… or any other grain you like! I personally have not tried it this way, but it’s an idea!
- You can also sprinkle just a little kewra water or rose water (or both) on top of the complete assembled biryani in Step 7 for a rich, deep taste and lovely aroma. It’ll smell like a restaurant-style butter chicken biryani then! I prefer the natural aroma of this dish though so I skip out on doing this ❤.
- A small variation also is to just have the marinated cooked chicken as it is, as maybe a snack, or appetizer or as a quick main meal along with some plain rice (with Indian pickle on the side) or maybe even with some biryani rice or butter garlic naan. The cooked pieces of chicken taste incredible and I need to control myself every single time from attacking the plate and finishing all of it before adding it to the butter chicken sauce. The cooked chicken is amazing on its own.
- Maybe you’re busy and don’t have much time but want to have a meal that’s a little indulgent. So… you can just have the butter chicken curry with steamed rice, biryani rice or naan as it is. It’s scrumptious! For more details visit our Dreamy Creamy One Pot Mouthwatering Butter Chicken Curry recipe!
- In this recipe, you can increase or decrease the amount of chicken or rice used too. If you prefer more buttery butter chicken curry in your butter chicken biryani, just increase the amount of butter chicken you make and reduce the amount of biryani rice. If you prefer more of that rich aromatic biryani rice and less of the butter chicken, go ahead and increase the amount of rice you use and reduce the amount of butter chicken you make. In this recipe, I’ve given a butter chicken to biryani rice ratio that I feel is best but you don’t necessarily have to agree 😉. Make it the way I’ve given here first and then go ahead and increase or decrease the butter chicken or biryani rice according to your preference!
Continue reading if you would like to read about vegetarian, dairy-free, gluten-free, nut-free or vegan adaptations of this recipe.
Note- If you think you have an ingredient that you feel is suitable as a substitute for a certain ingredient in this recipe, according to your dietary preference, you can use it and let us know how it works as a substitute in the comments below. I’ll then add it in as an adaptation suggestion here. This will help so many others with the same diet preference as yours.
Vegetarian Adaptation:
A vegetarian version of this butteriest scrumptious butter chicken biryani can be made in quite a few ways. Here we go!
- Instead of chicken, you can use cottage cheese. There’s this delicious Indian dish called Paneer Butter Masala, which tastes a lot like butter chicken with cottage cheese instead of chicken! It tastes sooo good, you guys. It’s a cheesy, buttery, creamy delight! Just go ahead and slice your cottage cheese into fat cubes. Marinate it for at least an hour and then cook it accordingly. Please be super careful when cooking your cottage cheese so you get just the right amount of browning on the outside while having it remain nice, soft and cheesy on the inside!
- If you don’t have cottage cheese on hand, you can also use any vegetable of your choice instead, like maybe potato for some scrumptious potatoey buttery curry. Or cauliflower? Or even a combination of multiple vegetables for a buttery vegetable curry. You can also use a vegetable that’s in season that you feel may go well in this recipe. Just marinate your vegetables the same way, cook them accordingly and follow the rest of the recipe as given!
- You can also use a combination of cottage cheese and your favorite vegetables. Marinate them, cook them accordingly and follow the rest of the recipe as given.
- Make sure the dairy products you use here do not contain gelatin.
Please always read through the ingredient list of all the other ingredients in the recipe to make sure they are vegetarian.
Dairy-Free Adaptation:
Butter chicken doesn’t need butter to taste delicious. Here are a few things you can do to make some delicious dairy-free butter chicken biryani…
- You can skip out on the Greek yogurt and cream in the marinade for the chicken and use the rest of the ingredients to marinate it instead. You can also try adding some mayonnaise to these dry spices because mayonnaise helps all the spices stick better to the chicken and keeps the chicken nice and juicy too. This is just an idea and you don’t have to do it if you don’t prefer mayonnaise. You can also try adding coconut cream or coconut milk instead. Make sure the marinade doesn’t get liquidy though and stays thick.
- Instead of butter, you can use some vegan butter. I’ve not tried this but I’ve heard it’s a good substitute. You can also just go ahead and use a little more oil to fry the onions in and use only that onion-flavored oil instead too. If you’re doing this, keep some extra onion oil on the side for the biryani assembling process.
- Instead of light cream/heavy cream, use canned coconut cream or milk when making the curry. Use the thick and creamy top layer, if you can. Make sure it’s full fat too so it’s nice and creamy!
- Add some oil to the rice while it cooks instead of ghee.
- In the assembling process, you can use vegan ghee or some of the remaining onion oil if you prefer, instead of ghee. Coming to the saffron milk, you can warm a little water and add your saffron threads to it to make some saffron-flavored water.
Hey, if you feel some ingredients can be substituted for any other ingredients here and you’ve tried it that way, let us know! We’ll add it in if it worked for you. It’ll help so many other people with the same diet preference as yours!
Please read through the ingredient list of all the other ingredients in the recipe to make sure they are dairy-free. That’s because hidden dairy may be present in some ingredients.
Gluten-Free Adaptation:
Rice is naturally gluten-free (yay!) so this butteriest scrumptious butter chicken recipe makes for a wonderful gluten-free meal.
But hey, there are some things you should keep in mind…
- Many dairy products in their natural form are gluten-free BUT some Greek yogurt may have additives that contain gluten. Please go through the ingredient list on the food label of the Greek yogurt you buy to make sure no additional ingredients that may contain gluten are added to it.
- The same goes for light cream/heavy cream too. Please go through the ingredient list on the food label of the cream you buy to make sure no additional ingredients that may potentially contain gluten are added to it.
- Butter is gluten-free but sometimes, it may be seasoned and these extra ingredients added to it for seasoning may contain gluten, so please make sure your butter is not flavored and does not contain any suspicious additional ingredients. Always check the ingredients given on the food label of the butter you buy.
- Ground spices on their own are gluten-free but they may sometimes contain hidden gluten. That’s because they either get contaminated in the factory during production or also because they have flour added to them. Please make sure the ground spices you use are gluten-free.
- Please also make sure the cooking oil you use does not contain any additives that contain gluten.
Always read through the ingredient list of all the other given ingredients in the recipe to make sure they are gluten-free. This is because hidden gluten may be present in some ingredients.
Nut-Free Adaptation:
To make some delicious nut-free butter chicken biryani, go ahead and…
- Please make sure the cooking oil you use does not contain nuts or is not derived from any nuts.
- Some spices use nuts as a filler in their powders. Please make sure you go through the ingredients of any spices you’re buying to make sure they don’t contain nuts.
- Black pepper may cause issues for people who are allergic to tree nuts. You can choose to skip out on this.
- Skip out on the cashew nuts when making the butter chicken sauce. Don’t worry, the butter and cream will do their magic and your curry will still be rich and creamy.
As always, please make sure you thoroughly read through the ingredient list of all the spice blends and other ingredients that have been mentioned in this recipe before cooking. Hidden nuts may be present in some ingredients.
Vegan Adaptation:
To make the butteriest scrumptious vegan butter chicken biryani, go ahead and follow the instructions below…
- You can use some firm or extra firm tofu instead of chicken here. Just go ahead and cut your tofu into nice fat chunks, use the same marinade as the one given here (excluding the non-vegan ingredients) and then cook it in all that scrumptiousness!
- You can also use any vegetable of your choice instead, like maybe potato for some scrumptious vegan potato curry. Or cauliflower? Or even a combination of multiple vegetables for a vegan vegetable curry. You can also use a vegetable that’s in season that you feel may go well in this recipe. Just marinate your vegetables the same way, cook them accordingly in a pan like we do with the chicken here and follow the rest of the recipe as given!
- Skip out on the light cream/heavy cream and Greek yogurt in the marinade and add in some coconut cream or coconut milk instead. But make sure the marinade doesn’t get too liquidy (by using the thick creamy layer on top in canned coconut milk/cream and by not using too much of it) and stays thick and creamy.
- Make sure you use lemons that haven’t been waxed. Waxed lemons are not vegan because the wax on these lemons contains shellac, which is derived from the female lac bug.
- Instead of butter, you can use some vegan butter. I’ve not tried this but I’ve heard it’s a good substitute. You can also just go ahead and use a little more oil to fry the onions in and use only that onion-flavored oil instead too. If you’re doing this, keep some extra onion oil on the side for the biryani assembling process.
- Instead of light cream/heavy cream, use canned coconut cream or milk when making the curry. Use the thick and creamy top layer, if you can. Make sure it’s full fat too so it’s nice and creamy!
- Sugar is usually refined in a process that involves bone char. You can use a type of vegan sugar you prefer or even maple syrup to add that slight sweetness to your vegan butter “chicken” curry here.
- Add some oil to the rice while it cooks instead of ghee.
- In the assembling process, you can use vegan ghee or some of the remaining onion oil if you prefer, instead of ghee. Coming to the saffron milk, you can warm a little water and add your saffron threads to it to make some rich saffron-flavored water.
And as always, please read through the ingredient list of all the given ingredients in the recipe to make sure everything is vegan.
Hey, if you feel some ingredients can be substituted for any other ingredients here and you’ve tried it that way, let us know! We’ll add it in if it worked for you. It’ll help so many other people with the same diet preference as yours!
Disclaimer– I’ve done research to make things easier for you guys, but please make sure you do your own research too if you are allergic to something or have a specific diet preference. The suggestions given above for dietary preferences are only suggestions and NOT medical advice. These are suggestions given just after a little research on the said dietary preferences. We are NOT trained medical professionals or nutritionists. You are responsible for yourself, so please ask your physician if you have any questions and make sure you always completely read through the ingredient list of any ingredients you use.
HOW TO MAKE THE BUTTERIEST SCRUMPTIOUS BUTTER CHICKEN BIRYANI EVER [Step-by-Step Instructions With Photos]
For exact ingredient measurements and instructions without photos, please scroll down to the Recipe Card.
Please keep in mind that I go into lots of detail in all my recipes so you get to know all the super important tips and tricks when it comes to making a particular recipe. I always want you to make the BEST of whatever you’re cooking ❤.
Okay guys, we’re doing this. Get ready!
It’s time to make one of the most beautiful, interesting and fun to make recipes out there.
You’re soon gonna have your kitchen fill up with the most mouthwatering aromas ever ANDDD you’re gonna be eating this delicious dish in just some time if you’re starting right now.
How exciting is that?
There are eight major steps in this recipe and the instructions have been given according to each of these steps.
The steps involved in making this recipe are:
- Marinate the chicken
- Fry the onions (also called Birista)
- Cook the chicken
- Make the base of the butter chicken curry
- Finish cooking the butter chicken curry
- Cook the biryani rice
- Assemble the butter chicken biryani
- The *dum* process
Don’t worry, it’s incredibly fun and I’ve tried being super clear and detailed in the instructions.
If you have any questions, just ask in the comments below. I’ll reply as soon as I can!
Try and get all the ingredients ready for each step too. It’ll make things easier (the ingredients and their quantities are given in the Recipe Card below)!
So…
STEP 1: MARINATE THE CHICKEN
Cut your chicken into nice medium-sized fat cubes.
Transfer the chicken cubes to a bowl.
Now, add all the ingredients needed for marination to it.
Rub those spices all over the chicken cubes.
I always suggest you go in with your hands if you can. You can get into all those tiny chicken bits with this delicious marinade.

You can use gloves too, if you prefer.
Once you’re done mixing everything together, go ahead and wrap the bowl with some cling wrap.
You can use an airtight container or zip-lock bag too.
Now, move your bowl of chicken to the fridge.
Let it marinate for at least an hour. But the more you marinate it, the better.
Overnight is ideal.
You have no idea how scrumptious this marinade makes our chicken.
Please try and let your chicken marinate for more than an hour, if you can. But if you’re in a hurry, you can wait just an hour.
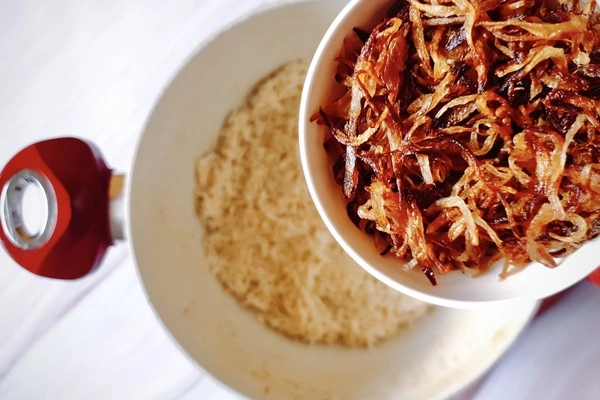
STEP 2: FRY THE ONIONS (ALSO CALLED BIRISTA)
Okay guys, this is a super easy process. But you need to keep a constant check on your onions because it takes literal seconds for the onions to go from ahh so delicious and pretty to oh my goodness they’re burnt!
But trust me, if you keep a constant check here, especially once your onions start browning, you’re safe ❤.
A small tip- The onions need to be thinly sliced for even frying. Please keep in mind that the onions should not be reallyyy thinly sliced though. That’s because we don’t want them to be very crispy and we want them to retain that deep delicious rich oniony flavor because it’ll taste amazing in our butter chicken biryani. This type of fried onions taste really good with practically any type of biryani. You can check how I sliced my onions to understand better in the pictures below! You can also really thinly slice them and just deep fry them for extra crispy onions if you prefer that in your biryani.
Now…
Once you’re done marinating your chicken, remove it from the fridge so it reaches room temperature while your onions cook.
If you’re cooking this recipe in one pot, like me, make sure you use a Dutch oven with a lid.
So, in your Dutch oven, pour in the oil and let it heat over medium-low heat.
Once the oil is heated through, add in your sliced onions and a pinch of salt too.
The salt will help draw the moisture out from your onions, helping them brown faster!
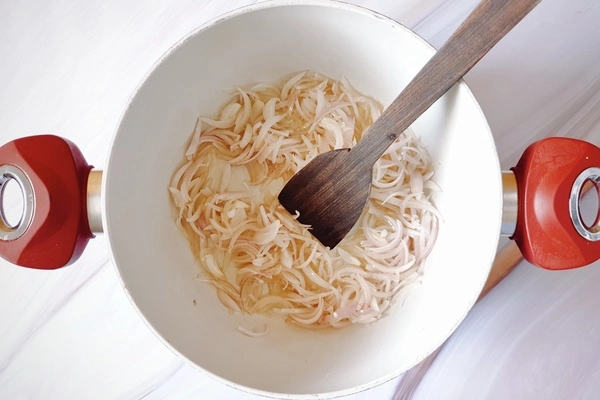
Now, just have fun sautéing your onions.
I like spreading the sliced onions all over the pan, letting them cook for a bit. Then bringing them all together and cooking them right in the center flattening them with the ladle then turning them and just… I think you can see how much I love cooking ❤.
If you’re a little apprehensive because you’re new to cooking, just go ahead and have fun!
Get to know the ingredient and how it acts in oil, move it around, pile it up, spread it out… play some music, have fun 💃🏻.
Cook your onions for about 20 to 25 minutes.
Guys, this may seem like quite a bit of time but it’s sooo worth it!
Do NOT try hurrying up and increasing the heat here or you may burn your onions.
When your onions are in the pan, sizzling, after about 18 to 23 minutes, you may notice them turning a golden brown.
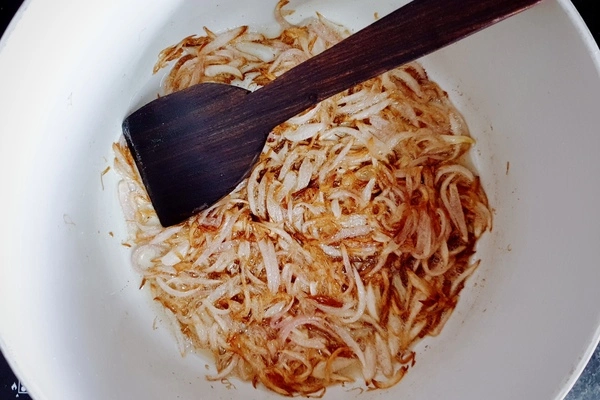
This is an important stage. That’s because once your onions start browning, they’ll start browning incredibly fast.
Keep a close check on them and once they turn a gorgeous deep golden brown (not light brown), remove them.
Your onions should be a deep brown, but shouldn’t be a dark almost black brown.
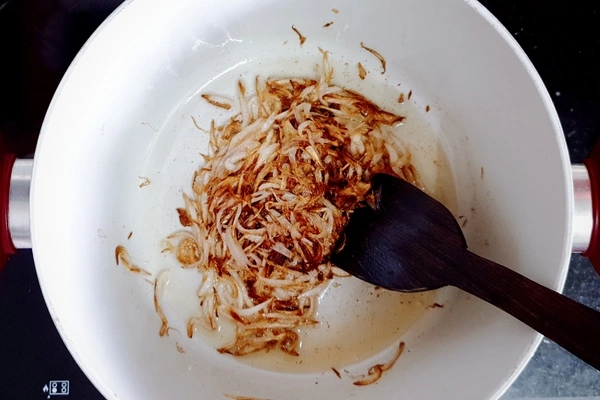
Strain your onion slices in a strainer first.
Keep the remaining oniony oil in the Dutch oven to use later.
Then, spread them on a plate with paper towels on it to absorb the excess oil, if any.

If you feel there are a few onion slices that haven’t browned much, let them stay in the pan and remove the other onion slices that have already browned.
Try and do this as fast as you can because the already browned onions will continue to cook and brown a little more once you remove them too. That means they’ll get darker.
BUT HEY, if that’s a little difficult to do and you see there are more browned onions than those that aren’t completely browned, just go ahead and remove all your onions. A few light golden onions here and there won’t matter.
So yes, that’s done with!
Give yourself a pat on the back. Browning onions is one of the major steps involved in making Hyderabadi Biryani (which is literally THE MAIN biryani out there, it’s believed all other biryanis came from it).
Browning your onions just right is a big deal, and you’ve done it ✨!
Now, there’s another gorgeous ingredient in the Dutch oven. That’s your fried onion oil!
It needs to be in the Dutch oven for the next step.
Strain this onion oil and then pour a teaspoon of it back into the Dutch oven.
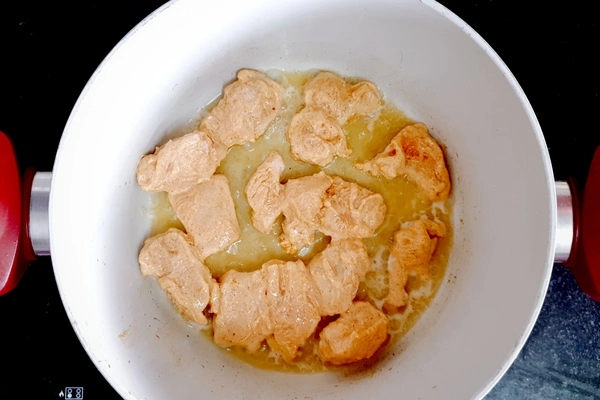
STEP 3: COOK THE CHICKEN
Here comes one of the most scrumptious parts of this recipe.
The CHICKEN!
Now, there may already be that delish onion oil in your Dutch oven.
Raise the heat to medium-high.
Add in the butter.
Stir until the butter melts and mixes in with that onion oil.
Now, once the oil and butter are heated through, add in your marinated chicken cubes. DON’T add in the marinade with the chicken.
If they don’t fit all at once, don’t overcrowd the pan!
Cook in batches so all your pieces of chicken cook evenly and form that scrumptious crust.
If you add all your pieces of chicken together, you won’t get the crust we’re going for and your chicken will steam instead. We don’t want that.
Now, cook those delicious pieces of chicken for 5 to 6 minutes on one side.
You can also reduce the heat to medium if you feel your chicken is browning too fast.
Please keep in mind that the cooking time may vary depending on how much chicken you have in your cooking pot, the size of your chicken cubes, how much marinade went in with the chicken, the cooking pot you’re using and your stove.
Now after 5 to 6 minutes have passed, using tongs if you can because they make things so much easier, gently turn and check one of the chicken cubes to see if it has browned and formed a nice reddish-brown crust.
if not, cook just a little more until that side of your chicken cubes turns reddish brown and is cooked.
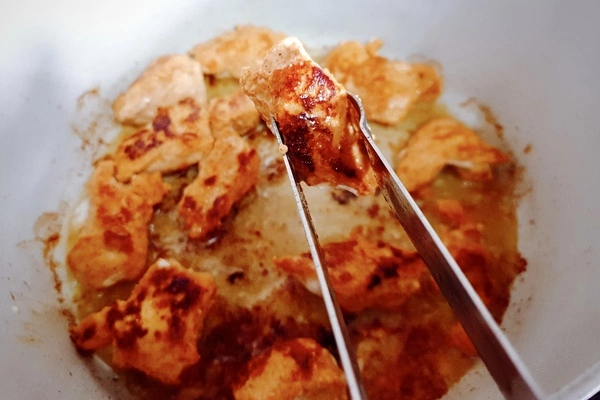
Once the chicken browns well on that side, go ahead and turn the chicken cubes and cook them for another 3 to 4 minutes until they form a gorgeous reddish-brown crust on the other side too.
After 3 to 4 minutes, your chicken cubes should be nice and brown now.
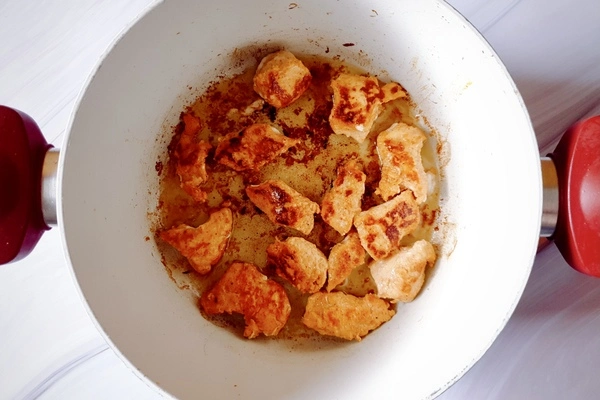
Then, reduce the heat to low.
Check all your cubes of chicken. There may be some sides that haven’t browned enough. Turn your cubes of chicken to the least browned side.
And then, cover the Dutch oven and let the chicken cook over low heat for about 5 minutes.
This extra step will make your chicken cubes nice and juicy 😍!
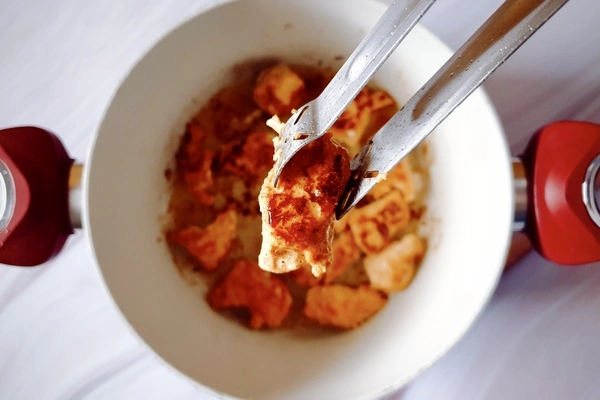
Once 5 minutes are up, remove the chicken cubes and cook the next batch.
If you want a little char (like tandoori chicken), you can always cook your chicken a little extra over high heat so it browns a little more. Slightly charred chicken tastes amazing in this recipe.
Add a teaspoon of butter before starting to cook the next batch of chicken.
The second batch may cook much faster so keep a check!
Don’t get rid of anything in the Dutch oven once you’re done cooking your chicken.
This is a one-pot meal and every single thing in that Dutch oven matters because it’s all contributing to the most amazing flavors EVER!
And those cooked chicken bits stuck to the bottom of the pan? You’re gonna love what they do in the next step!
Go ahead and try a piece of that chicken now. Doesn’t it taste absolutely divine?
HIDE those pieces of chicken (so you don’t attack them. I know I can’t stop myself 🤩) and jump to the next step.
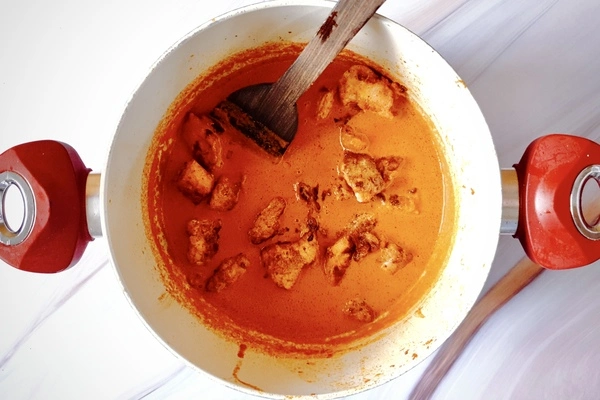
STEP 4: MAKE THE BASE OF THE BUTTER CHICKEN CURRY
In the same Dutch oven, over low to medium-low heat, add in the onions and cashew nuts.

Sauté them for about 2 minutes until the onions are softened just a little bit. Mix them in well with all those delicious cooked chicken bits!
Please make sure you don’t cook the onions for more than 2 minutes.
If the onions start cooking and turn golden brown (on their own, not because of the chicken bits), your butter chicken sauce may not get that characteristic deep reddish-orange color.
Now, add in 1+1/2 cups or 355 ml of water along with all the other ingredients given under this step– tomatoes, cloves, cinnamon, garlic, ginger, Kashmiri red chili powder, bay leaves, cardamoms, butter, salt and pepper.
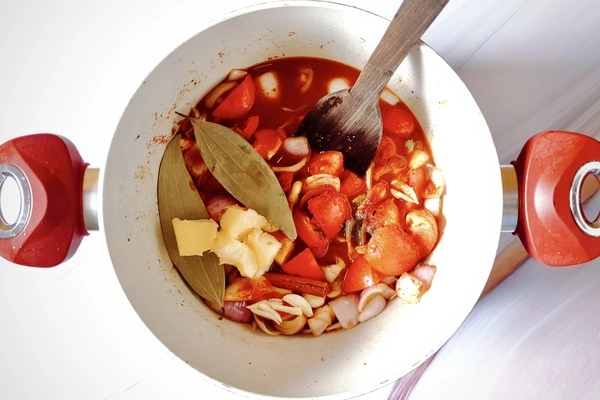
Gently mix everything together.
Now, raise the heat to high and bring everything to a boil.
Once everything comes to a boil, cover the Dutch oven, reduce the heat to medium-low and cook for at least 12 to 15 minutes.
*During this time, go ahead and wash (at least thrice or until water runs clear) and soak your rice so it’ll be ready in time once we are done cooking our butter chicken curry!*
Anyway…
You need to cook everything until the tomatoes and onions are soft, mushy and cooked through.
Once 12 to 15 minutes are up, lift the lid and with your ladle, try and smoosh the tomatoes (if they don’t smoosh easily, cover and cook the mixture well until the tomatoes mush easily).
If they are mushy and easily smush down, your butter chicken base is ready to be blended! Leave it be to cool down before blending it.
Make sure you remove the cinnamon stick, bay leaves, cardamoms and cloves before you blend this mixture.
Dispose of these spices and don’t add them back to the curry after blending.
Let everything cool down before you blend it.
Blend only once the mixture is at room temperature or even cooler.
If you blend the hot mixture immediately, the blender may explode because of all the heat and steam so *please be careful*!
Blend everything into a fine smooth sauce.
Now, strain it in a separate bowl!
Straining it will give you that characteristic smooth, silky, soft butter chicken sauce.
Set it aside and move to the next step!
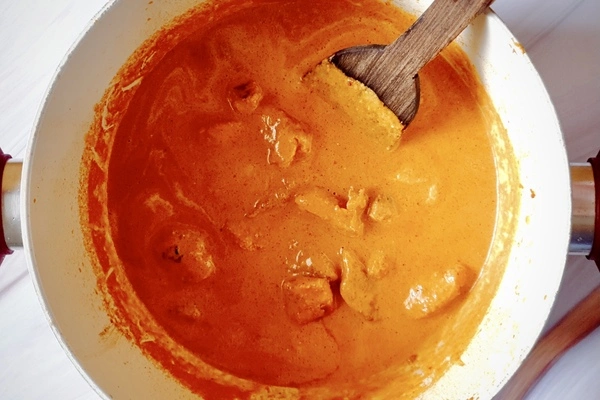
STEP 5: FINISH COOKING THE BUTTER CHICKEN CURRY
In the same Dutch oven, add some butter and smashed garlic.
Sauté for a minute on medium-low heat.
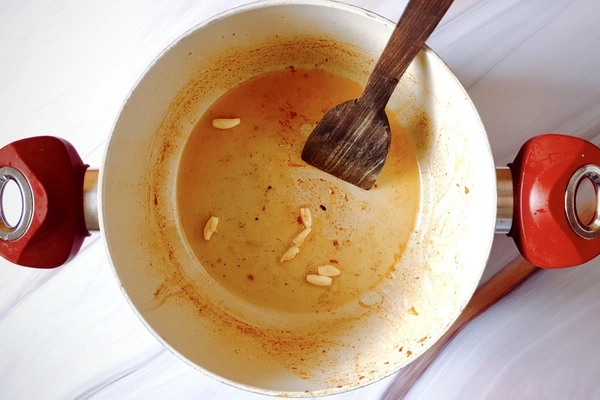
Then, add Kashmiri red chili powder and ground coriander to the garlicky butter.
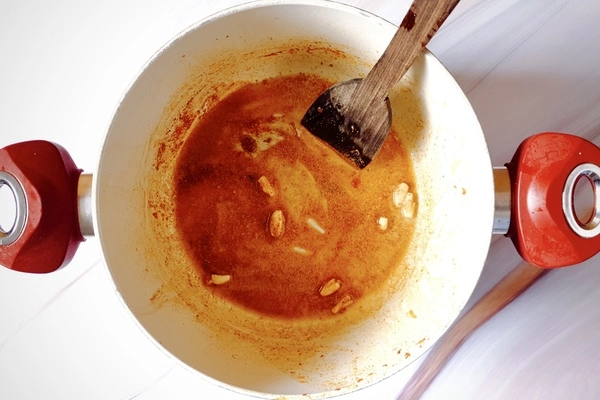
Shake it all a bit, let that garlic, Kashmiri red chili powder and ground coriander cook well in that butter for a minute or two and then add the blended and strained onion and tomato sauce to it.

Stirrrr incredibly well for another minute or two.
Let all those amazing flavors mix together ✨.
Now, gently add your delicious cooked chicken cubes to the smooth scrumptious butter chicken sauce.
Mix everything really well together.
Let the chicken lend its flavors to the butter chicken sauce and absorb that amazing buttery tomatoey-ness in the process too.
It’s a gorgeous intermingling of flavors.
Stir it all together for about 2 minutes or so, and then add in the cream and sugar.

Gently stir everything together.
Give your butter chicken curry a taste, add in more sugar if you prefer.
Reduce the heat to low.
Then, cover the Dutch oven and let your butter chicken curry cook for about 5 minutes.
After 5 minutes are up, gently lift the lid and give your butter chicken curry a taste.
If you feel there should be more sugar, salt or pepper, add it in.
Once you’re pleased with the seasoning in your butter chicken curry, add in the crushed dried fenugreek leaves.
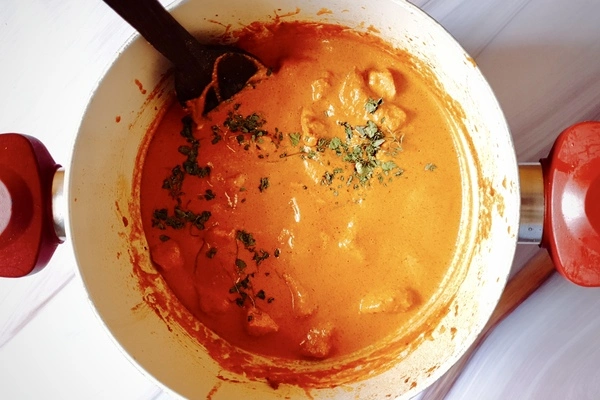
Gently stir and switch off the heat.
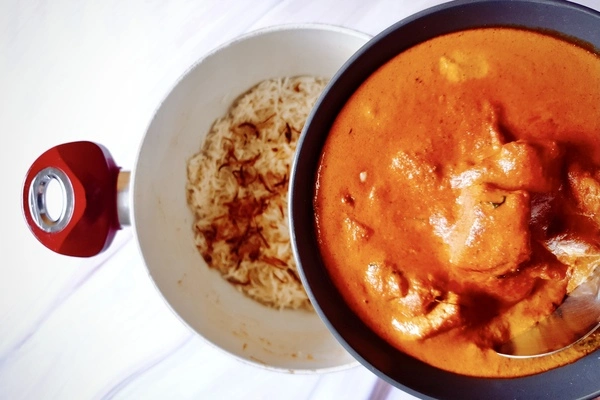
Remove your butter chicken curry in a separate bowl and set aside.
Give it a taste. That’s one of the most delicious, indulgent, scrumptious dishes in the whole world right there.
And you made it! How awesome are you, huh ⭐?
Let’s move to the next step!
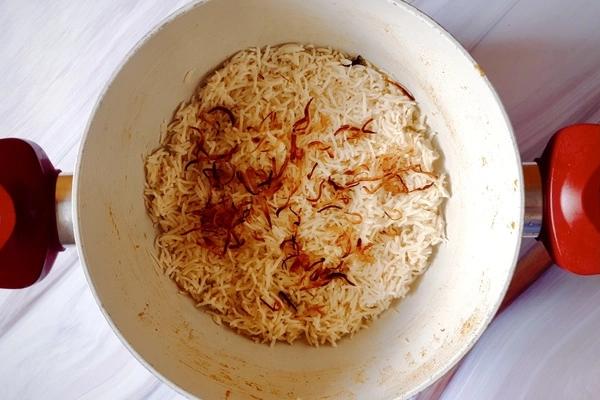
STEP 6: COOK THE BIRYANI RICE
Your rice may have been soaking for about half an hour at this point if you kept it for a good soak in Step 4 like I asked you guys to!
Now, in the same Dutch oven, pour in 3 cups or 700 ml of water.
Add in the salt, ghee, cloves, cardamoms, cinnamon and bay leaves to it.

Salt is incredibly important when making biryani rice. We do not want bland biryani rice! The amount of salt you add needs to be just right.
Go ahead and taste the water before you bring it to a boil. The water shouldn’t be too bland, nor should it be too salty. It needs to be just right.
Now, raise the heat and bring the water to a boil and let the spices cook in this boiling water too.
Once the water is boiling like whoa what the heck 😱?!.. Add in the rice.
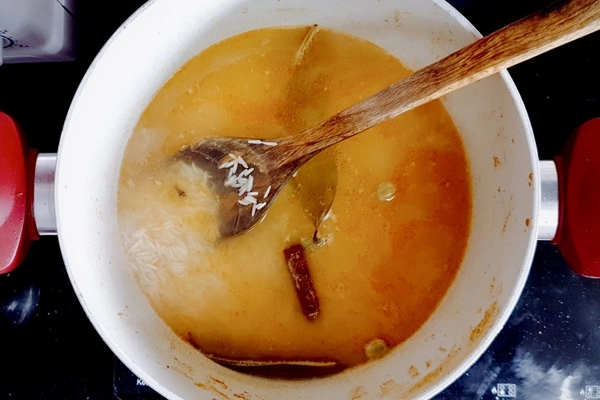
Let the rice boil for about 2 minutes.
The water needs to be boiling strongly when our Basmati rice touches it because the size of our rice grains will increase and puff up immediately upon touching this boiling hot water.
Be careful here though because if you boil your rice for a little more than 2 minutes, your rice grains may start to break.
After 2 minutes of boiling your rice, reduce the heat to low.
Cover the Dutch oven and cook for about 6 to 7 minutes.
*While your rice cooks, warm some milk and add some saffron threads to it to give it some time to infuse for the next step.*
Please keep in mind that the amount of time you need to cook differs from one type of rice to another.
Even if your rice is the same type as mine (Basmati), the time you need to cook will differ from literally one brand to another.
I’ve given the time and method I’ve used to cook my rice here to give you guys a bit of an idea to help with any confusion you may have.
BUT… Please try and follow the package instructions of the rice you use and cook just a little lesser than the time they’ve asked you to cook it for. The rice should be 80 to 90% cooked. That’s my advice ❤.
Anyway…
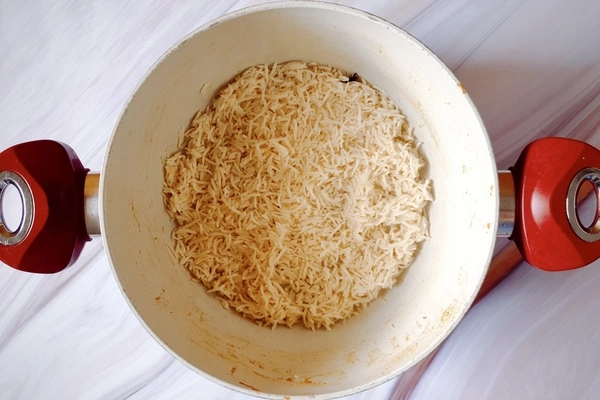
Once 6 to 7 minutes are up, try a grain of rice. It should be cooked 80 to 90%.
It shouldn’t be overcooked and it shouldn’t be incredibly undercooked either.
The rice grain should have just a little bite to it and should be almost done.
If your rice grain has a pretty hard bite to it, go ahead and cook your rice for another minute or two until it’s just almost done.
Or if you squish the rice grain between your fingers and it turns mushy easily, it means your rice is overcooked. But don’t panic, it’s okay! I’ve given some tips on what you can do about it below.
Anyway…
The rest of the rice will cook during the dum process which is the next step.
Drain your rice immediately. The longer your rice stays in the water, the more it’ll cook.
Set the rice aside and keep your Dutch oven where it is! We’re using it in the next step too.
Please don’t worry if your rice is overdone or underdone. Your butter chicken biryani will still taste incredible ❤.
Now,
If you feel your rice is mushy and overcooked in any way, don’t worry! It’s okay! Try doing the following:
- Lay your rice out flat over a plate or tray in a thin layer so it loses some of its moisture, airs out, doesn’t squish in with the other rice grains and also doesn’t continue to cook in its own heat. This will help it to dry out a little too.
- Once your rice cools down, go ahead and gently layer it with the butter chicken in the next step and then reduce the amount of time it steams for during the dum process.
If you feel your rice is incredibly dry and completely cooked through-
- Just go ahead and reduce the dum time in the next step. Don’t worry because your rice will absorb all that butter chicken curry and its delicious flavors and will soften up nice and good.
If you feel your rice is undercooked- If you feel your rice has a pretty hard bite to it, you can cook it for a few more minutes.
But hey, if you’ve already drained it, you can…
- Sprinkle a little water over every layer of rice you make during the biryani assembling stage (the next step).
- Along with that, steam your biryani a little longer in the dum stage.
- You can also use a slightly damp wet cloth, wrap it under the lid and then place the lid over the Dutch oven to help add more moisture to the rice while it steams.
And hey, the doneness of the rice does NOT matter much at all because this recipe will still be incredibly delicious, so don’t sweat it!
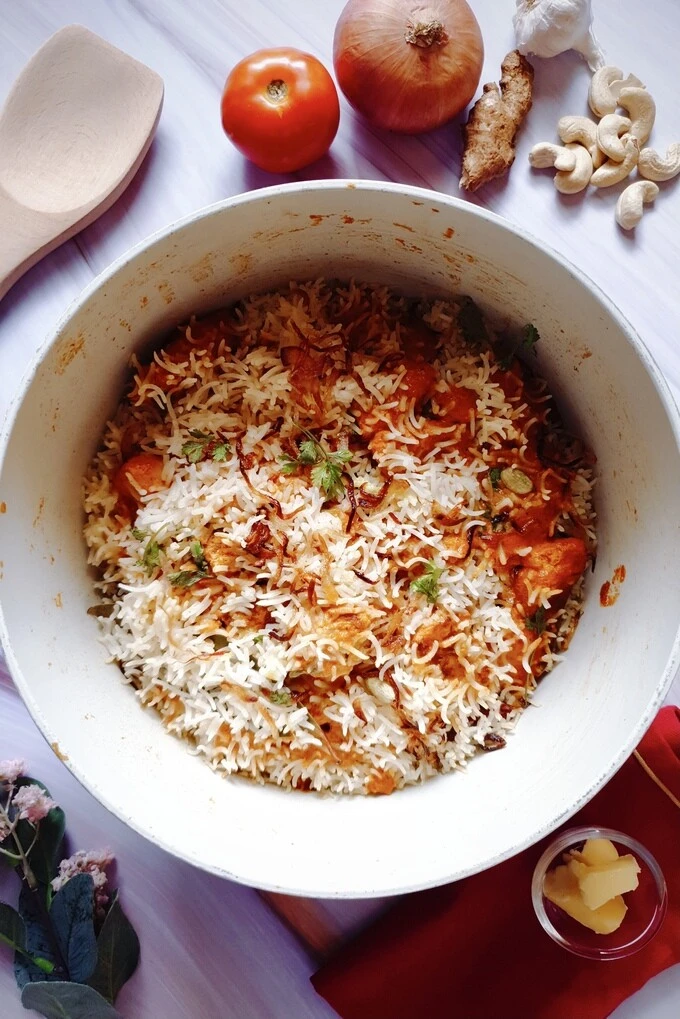
STEP 7: ASSEMBLE THE BIRIYANI
Yahoowee! Now’s the fun part.
Everything’s cooked and ready. We just need to bring all of it together. And how much fun is that now?!
This is not gonna be confusing.
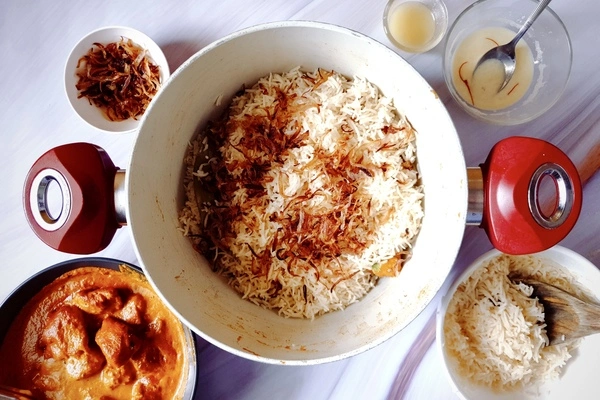
I need you to go ahead and keep all the ingredients around during this step-
- the cooked butter chicken curry,
- the almost-cooked rice,
- the ghee,
- the saffron milk,
- the onions we fried at the very beginning,
- and the cilantro.
If you haven’t made your saffron milk in the previous step like I asked you to, now is the time to make it. Warm some milk and add 9 to 10 saffron threads to it. That’s all!
Also, keep in mind that I’ve made multiple layers here. You don’t have to do that. You can follow any way you prefer.
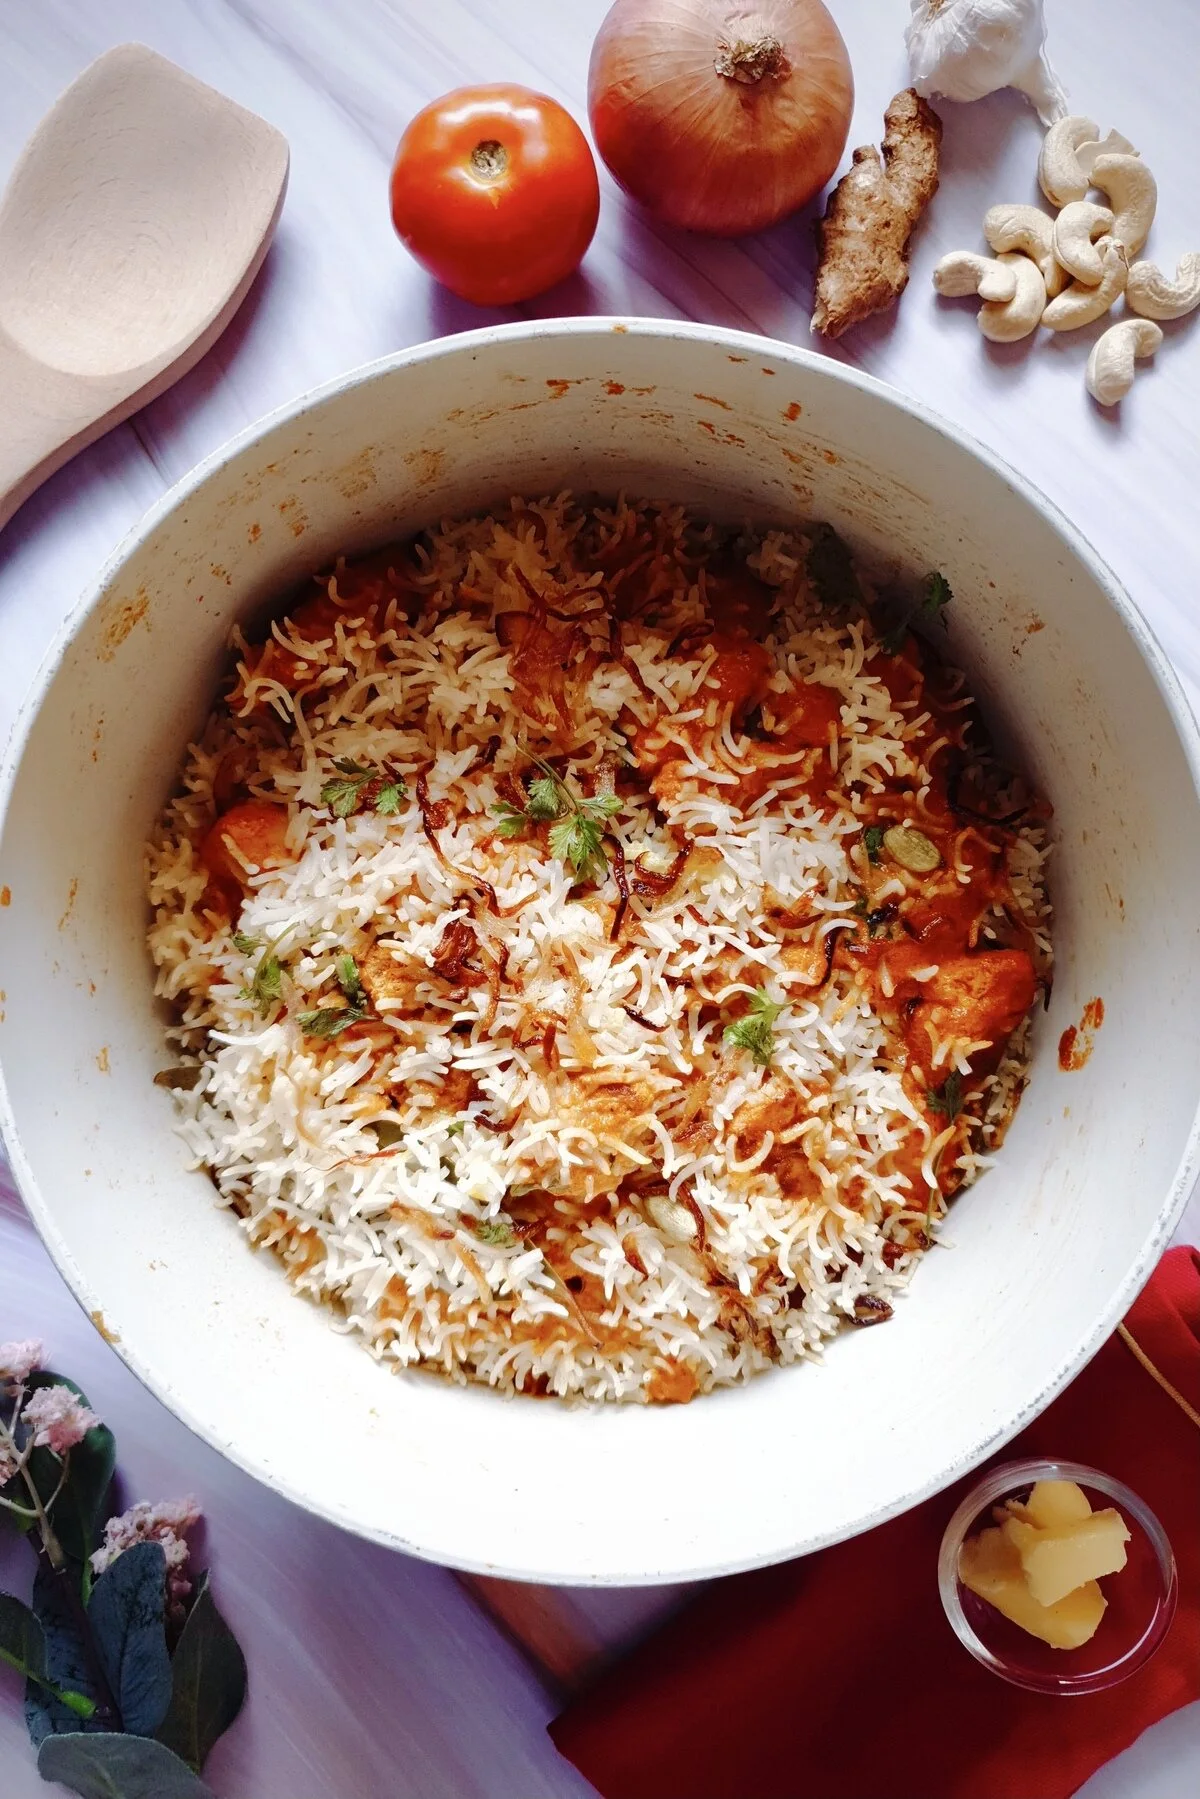
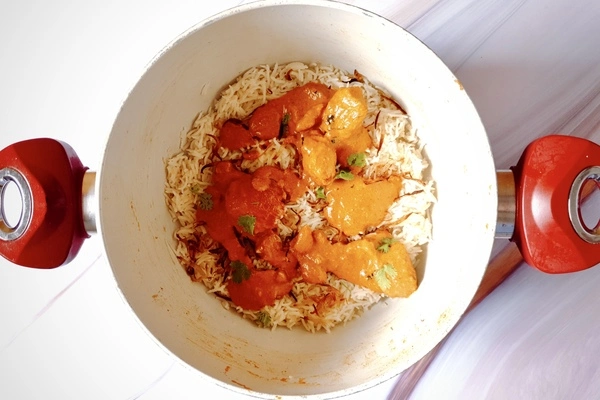
3 layers– rice, butter chicken, rice (spreading the ghee, saffron milk, fried onions and cilantro over each layer of rice every time)
5 layers– rice, butter chicken, rice, butter chicken, rice (spreading the ghee, saffron milk, fried onions and cilantro over each layer of rice every time)
7 layers (like I do here)- rice, butter chicken, rice, butter chicken, rice, butter chicken, rice (spreading the ghee, saffron milk, fried onions and cilantro over each layer of rice every time)
Make sure you add just enough of each ingredient to keep the rest of it ready for the next layer.
Let’s do this!
Once again, please make sure you don’t add too much of any ingredient because we need to save enough for each layer.
If you have any extra ingredient left, don’t worry, you can pour all of it over the last layer of rice on top (except the butter chicken, you need to finish it before adding the last layer of rice)!
The pictures will help a whole lot and if you still have any questions, ask me in the comments below!
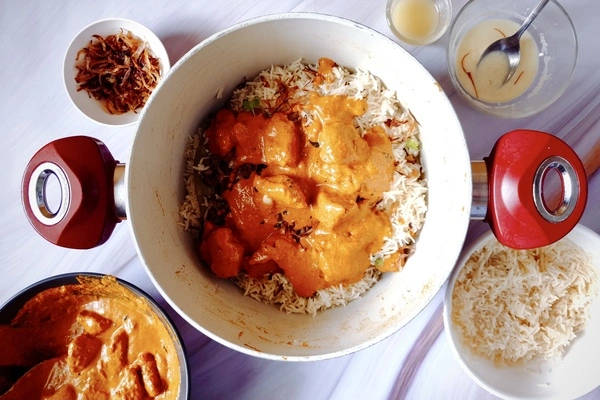
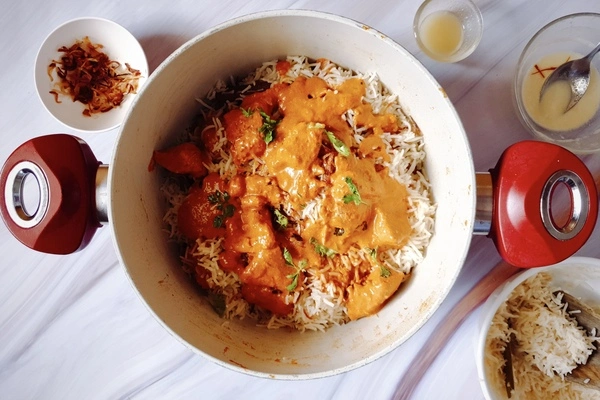
FIRST:
Using the same Dutch oven, take some rice and spread a thin layer of it on the bottom of your Dutch oven. This is gonna be the base of our butter chicken biryani.
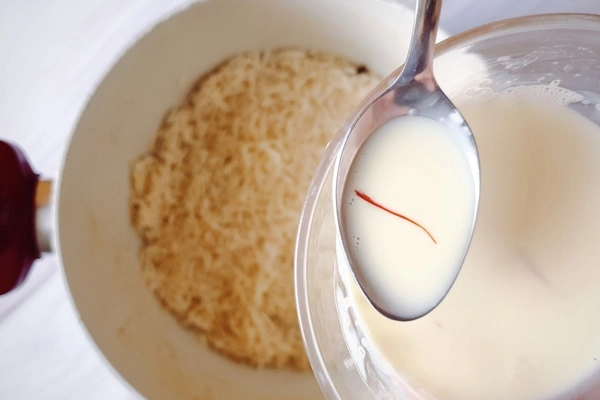
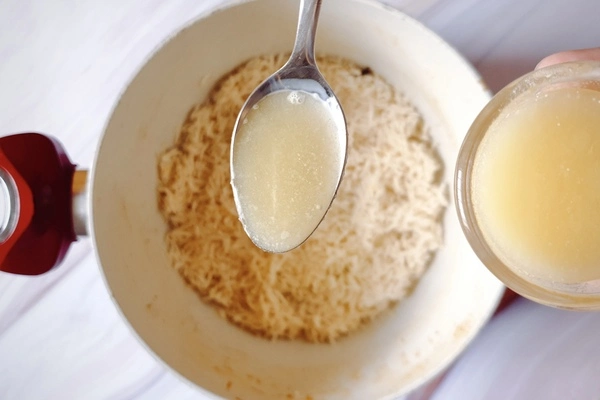
Then, spread and pour some saffron milk over it.
And spread some ghee.
Sprinkle some fried onions.
And then spread some butter chicken curry over it.
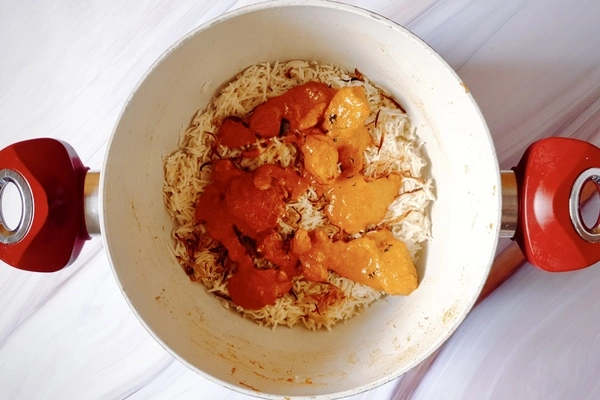
Sprinkle some fresh cilantro leaves over it.
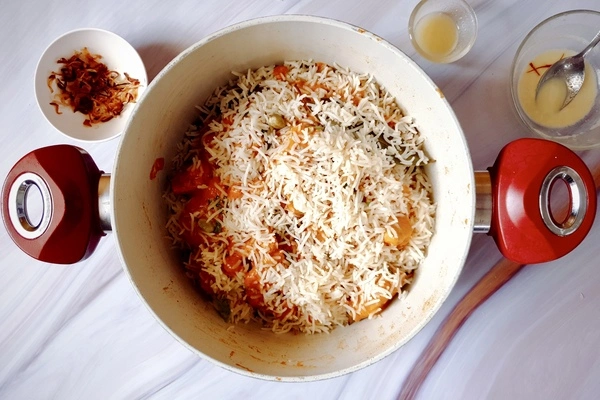
SECOND:
Cover it all with another thicker layer of rice now.
Spread and pour in some saffron milk, ghee and sprinkle some fried onions over it.
Then spread the butter chicken once again over it all and sprinkle with some fresh cilantro leaves.
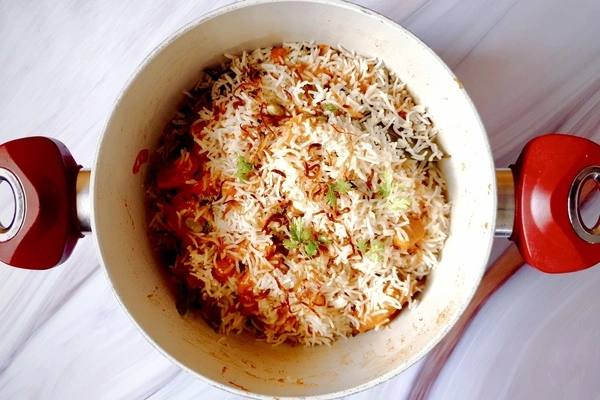
THIRD:
Cover the butter chicken with another layer of rice. Keep some rice aside for the final layer.
Once again, spread and pour in the saffron milk and ghee.
Sprinkle a few fried onions over it all.
Save these ingredients to use for the last layer.
Spread the butter chicken over everything and finish all of it.
Sprinkle some fresh cilantro leaves but keep some aside for the last layer.
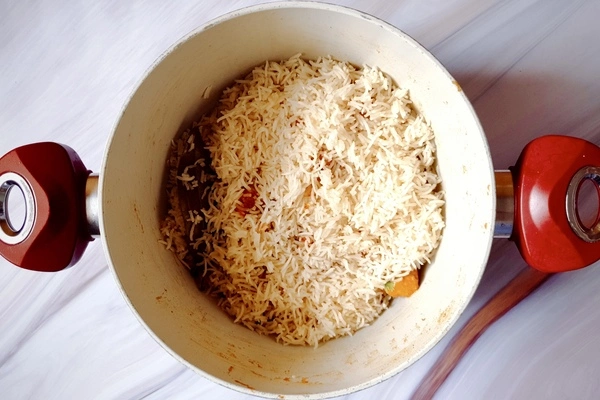
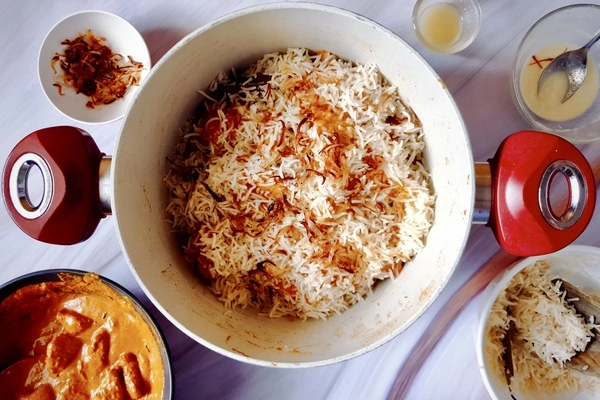
FOURTH AND LAST:
Spread the remaining rice all over the butter chicken.
Sprinkle the rest of the fried onions and then spread and pour in all of the saffron milk and ghee over it.
Sprinkle the rest of the fresh cilantro leaves over it too.
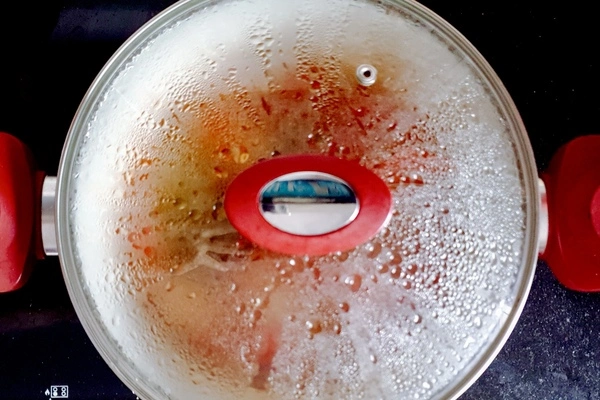
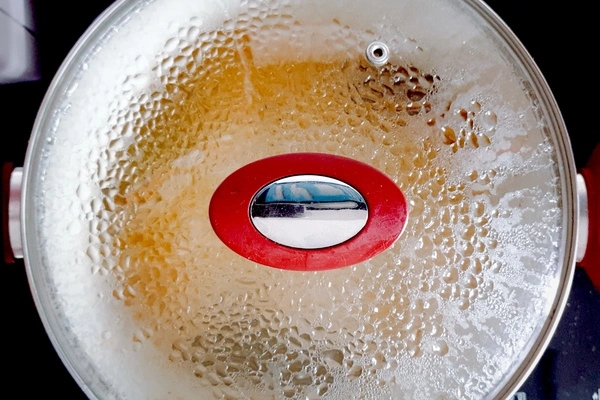
Cover all of it with your Dutch oven’s lid and move to the next step!
STEP 8: THE DUM PROCESS

And we’re finally here. Just moments away from eating this gorgeous dish we worked so hard on!
Let me tell you guys what to do here before giving you some more information about the dum process.
First of all, cover your Dutch oven.
You can use just your lid to cover your Dutch oven but you can also wrap a cloth under your lid and then place it over your Dutch oven.
You can also place some raw dough around the opening of your Dutch oven and then place your lid over it to seal it completely. This is traditionally done when cooking biryani.
Now, take your covered Dutch oven with the layered butter chicken and rice in it and place it on the stove over low to medium-low heat.
My suggestion to you guys here is to use the smaller-sized burner on your stove for the dum process.
You can use a medium-sized burner too.
If your burner is large, you run the risk of burning your butter chicken biryani during the dum process.
If you only have a large-sized burner though, place a flat pan over the large burner and then place your Dutch oven over it and let it steam over low heat.
The main thing here is to let your biryani steam over low to medium-low heat…
If you’re using a small-sized burner: steam for 25 to 30 minutes.
If you’re using a medium-sized burner: steam for 20 to 25 minutes.
If you’re using a large-sized burner: steam for 15 to 20 minutes over LOW heat.
You can also cook for slightly longer if you prefer the rice to crisp up at the bottom. You’ll learn with experience how long this will take according to the cooking pot you use and your stove.
The dum time may also vary depending on your Dutch oven and stove BUT the time I’ve given above is a safe bet and with time, you’ll understand what works best for you too!
Let’s talk about the dum process a little now.
This is an incredibly important process when making biryani.
In my opinion, it’s what makes a dish a biryani rather than just curry layered with rice.
I mean, I know all of it together makes a biryani, but the dum process plays a massive role in bringing everything together.
Dum basically is a process in which the cooking dish is sealed and placed over a low flame.
The food then steams within the cooking pot and cooks that way.
The cooking pot is sealed so steam doesn’t escape from it.
The food during the dum process steams slowly, gently cooking, absorbing delicious flavors.
During the dum process, our butter chicken curry absorbs all those gentle spices and flavors from the rice, as well as the ghee and saffron milk.
Our biryani rice absorbs all that buttery deliciousness from the butter chicken, that rich creaminess… all of it. As well as the ghee and saffron milk and the deep flavors of those delicious fried onions too.
People keep their biryanis on dum for quite some time. With time, you’ll learn and understand how long you prefer keeping YOUR biryani on dum for.
Anyway, once the time is up, switch off the heat and gently lift the lid off your butter chicken biryani once it’s cooled a little. Take in all that deliciousness…
AND WE’RE DONE 💖!
You’ve created one of the most delicious dishes in the whole world.
Go enjoy it and be super proud of yourself because what the heck? This wasn’t an easy dish to cook and you cooked it!
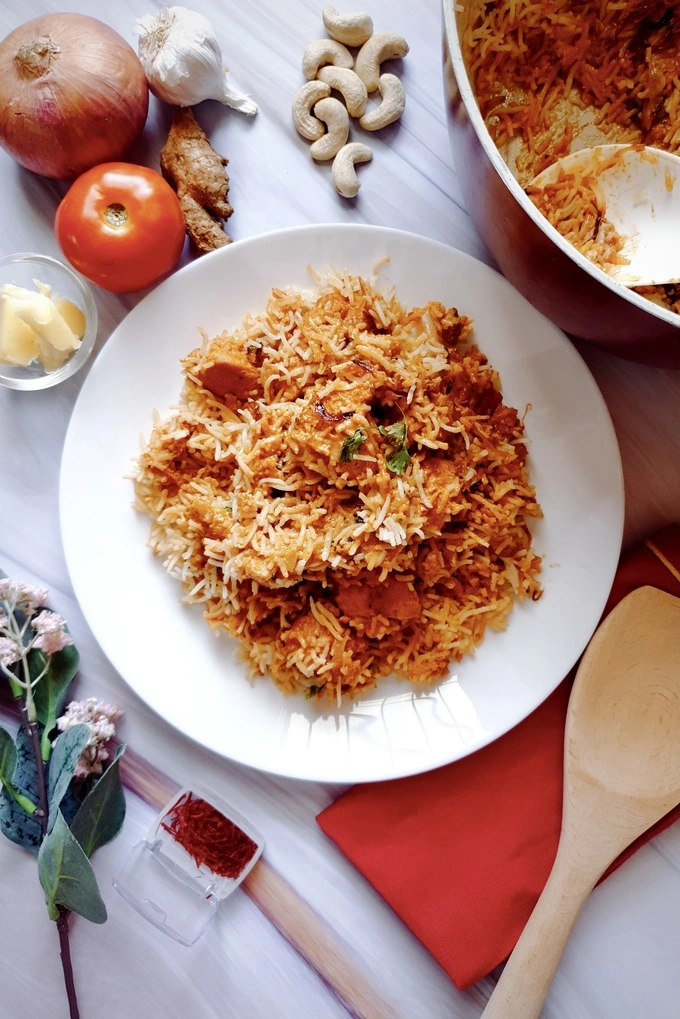
Serve your buttery lush butter chicken biryani nice and hot, don’t mix all of it together and use a long serving spoon to remove every layer right from the top to the bottom when serving it 😍
Hey you, I really hope you love this butteriest scrumptious butter chicken biryani recipe as much as I do!
If you do, I would appreciate a star rating SO much (you can rate this recipe right below or from the Recipe Card 💖).
Also, if you have any questions about this recipe, make sure to check out our FAQs section below to maybe find your answer there, or leave a comment and I will try to get back to you as soon as possible, I promise 😊.
TIPS TO MAKE THE BEST BUTTERIEST SCRUMPTIOUS BUTTER CHICKEN BIRYANI EVERY SINGLE TIME
Oh man, butter chicken biryani is such a beautiful dish.
It’s like, when I made it for the first time ever, I stared at it in awe.
How could a dish be so beautiful? In every single way? It looked gorgeous, smelled incredible and tasted… well, absolutely delicious.
It’s also an incredibly forgiving dish.
Your rice may come out a little too mushy sometimes or maybe you won’t have time to marinate your chicken for long enough… but this dish will taste incredible even through these tiny issues that may pop up.
That’s because there’s so much going on in this dish. There are so many main guys. The chicken, the butter chicken curry, the biryani rice… If you mess a tiny part up, don’t worry because it will all taste incredible together.
Here are some tips to keep in mind though, to get the most delicious butteriest scrumptious butter chicken biryani every single time:
- This recipe requires patience. It’s such a beautiful, rewarding and delicious recipe but make sure you have enough time to cook it patiently. It’s not a quick recipe and trying to hurry things up won’t let this recipe cook to its maximum potential, if that makes sense 😉!
- Get all your ingredients ready beforehand and if you can, divide them according to each step as well, so you don’t get confused. This will help heaps!
- Go ahead and cut your chicken into fat medium-sized juicy cubes. Then, try rubbing all that amazing marinade on your chicken cubes by hand if you can. I know it’s quite a task BUT your meat will be so much more flavorful and you’re the only one who can get all those spices in those hard-to-reach chicken places! You can wear disposable gloves and do this too.
- Marinating your chicken overnight is one of my biggest suggestions here. It tastes AMAYYYY-ZINGGGGGG! But I’m not kidding, you guys, please! If you’re really short on time though, marinate your chicken for at least an hour.
- Remove your marinated chicken from the fridge and keep it outside while your onions cook so your chicken can come close to room temperature. This will help your chicken cubes cook more evenly.
- Add just a pinch of salt to your onions while they’re sizzling in the oil to bring the moisture out in them which in turn will help in quick browning!
- I prefer my fried onions in biryani to be richer in taste than the usual crispy deep-fried onions, so I cut them thin but not really thin and I don’t deep-fry them either. I sauté them until they reach a deep brown and smell absolutely delicious. The method I’ve given goes super well with biryani and keeps a deep oniony delish taste. If you prefer crispier onions though, slice your onions super thin and deep fry them using more oil.
- You can also skip out on the cashew nuts if you don’t have any at home. Cashew nuts make our butter chicken curry lush and give a gorgeous rich taste too. But if you don’t have any, don’t worry. Just skip out on them because the butter and cream will work their magic and give you a rich curry too!
- Remove the cloves, cinnamon, bay leaves and cardamoms before blending everything together in Step 4.
- Kashmiri red chili powder gives our butter chicken curry that amazing red color and adding in cream gives it that characteristic deep orange color. If you prefer a darker red color butter chicken curry though, you can add in some more Kashmiri red chili powder or even red food color to the butter chicken curry. I don’t prefer doing this and prefer getting that color from the Kashmiri red chili powder. Don’t add too much Kashmiri red chili powder though because it may make your butter chicken curry a little spicy.
- Make sure you wash your rice really well at least 3 to 4 times to remove extra starch. This leads to your grains not sticking to each other and being separate and fluffy after cooking.
- And then, make sure you soak your rice for at least 15 to 20 minutes but not for more than an hour. A lot of good things happen when you soak your rice before cooking it. It helps the rice cook faster because the rice already starts absorbing water. Soaking rice also helps it keep most of that aroma even once it’s done cooking. There are so many more advantages to it that you can read on as well ❤!
- Salt is incredibly important when making biryani rice. We do not want bland biryani rice! The amount of salt you add needs to be just right. Go ahead and taste the water before you bring it to a boil. The water shouldn’t be too bland, nor should it be too salty. It needs to be just perfect.
- When cooking your rice, follow the instructions given on the package whether you’re using Basmati rice or not. Please remember that every rice brand and type cooks differently. So even if you’re using Basmati rice like me but of a different brand, your rice may take a different amount of time to cook. You can refer to the instructions I have given here but the best thing to do would be to follow the package instructions of the rice you’re using. The main thing you need to know is that the rice should be cooked 80 to 90% and should have a very tiny bite to it. Cook just a little lesser than the time suggested by the rice brand you’re using. There needs to be a little bite to the rice. If you squish your rice grain between your fingertips and see that it’s all squished and mushy, your rice is overcooked.
- Also, once your rice is 80 to 90% done, strain it immediately so it stops cooking. The longer your rice remains in the water, the more it’ll cook!
- If your rice is overcooked, what you can do is lay your rice out flat over a plate or tray in a thin layer so it loses some of its moisture, doesn’t squish in with the other rice grains and also doesn’t continue to cook in its own heat. Once it cools down, go ahead and gently layer it with the butter chicken and then reduce the amount of time it steams for during the dum process.
- If your rice is undercooked, you can sprinkle just a little water over every layer of rice you make during the biryani assembling stage. Along with that, steam your biryani for a little longer in the dum stage. You can also use a slightly damp wet cloth, wrap it under the lid and then place the lid with the damp cloth under it over the Dutch oven to help add more moisture to the rice while it steams.
- Not a tip. Just want to tell you guys that it doesn’t matter how well-cooked, overcooked or undercooked your biryani rice is. It’ll taste amazing anyway and we all learn from making tiny mistakes, right? So don’t sweat it ❤.
- To prepare your saffron milk for the layering and dum process, make sure you add your saffron threads to warm milk a little earlier to give it time to infuse. That will help open up your gorgeous saffron threads getting all that flavor and lush aroma out!
- During the dum process, use the small-sized burner on your stove. The dum process is supposed to take place over a small to medium-sized burner over low to medium-low heat. If your burner is large, you run the risk of burning your butter chicken biryani during this stage. If your stove’s burner is large and you can’t use the smaller one, place a flat pan over the large burner (make sure it’s burning over low heat) and then place your Dutch oven over it and let it steam.
- During the dum stage, you can wrap a cloth under your lid and then place it over the Dutch oven. You can also line the top of your Dutch oven with some raw dough and then place your lid over that! I’ve only used my lid here but you can use your imagination and have fun with the dum process. This is to prevent any steam from escaping from the Dutch oven.
- Remove the whole spices from the butter chicken biryani before serving it, if you can. That stray cardamom in a nice scrumptious bite ruins things for a millisecond or two and we don’t want that!
- Don’t mix the rice and butter chicken curry together once the butter chicken biryani has finished the dum process. Don’t do this while serving either. Instead, remove each serving of the butter chicken biryani using a long serving spoon or similar, that can get to the bottom of the Dutch oven and remove all the layers of the biryani in one go for each serving. Everyone deserves to get all those delicious layers of the biryani. Biryani is assembled in layers for a reason! Try not to disturb the layers by mixing them all together. Let the biryani remain as it is so the longer it stands, the more flavors are absorbed by the rice and butter chicken curry equally. You can mix it all in your plate anyway 😊!
- You can also cook the onions, the chicken, the butter chicken curry and the rice separately in different cooking pans if you’re in a hurry. You can cook all of them in any pan you feel is best, but try and use a Dutch oven when it comes to the last dum stage. Dutch ovens are heavy-bottomed which means your rice will be less susceptible to sticking on the bottom during the dum step (I love a little stuck rice though!). Dutch ovens are also deep and have the right shape to keep the steam inside themselves during the dum process which will result in even steaming all over.
- In this recipe, you can increase or decrease the amount of chicken or rice used too. If you prefer more buttery butter chicken curry in your butter chicken biryani, just increase the amount of butter chicken you make and reduce the amount of biryani rice. If you prefer more of that rich aromatic biryani rice and less of the butter chicken, go ahead and increase the amount of rice you use and reduce the amount of butter chicken you make. In this recipe, I’ve given a butter chicken to biryani rice ratio that I feel is best but you don’t necessarily have to agree 😉. You can make it the way I’ve given here first and then go ahead and increase or decrease the butter chicken or biryani rice according to your preference the next time you cook this recipe!
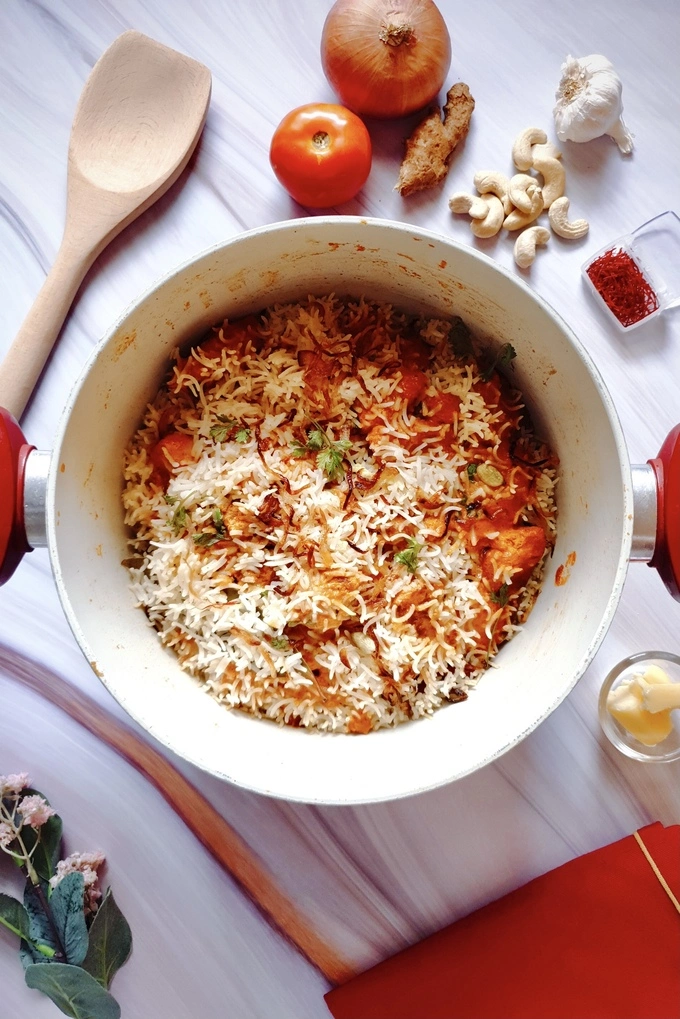
SERVING SUGGESTIONS FOR THE BUTTERIEST SCRUMPTIOUS BUTTER CHICKEN BIRYANI
This dish is amazing. That’s because there are so many different dishes we’re creating to bring all of it together.
Oh UM, how is that amazing?! Well, you can have each of these dishes on their own too if you prefer, that’s how!
Every single dish you create… the cooked marinated chicken, the butter chicken and the biryani rice will be so scrumptious on their own, you’ll have to fight your taste buds to continue with the recipe 😱.
Here are some interesting serving suggestions for this delicious butter chicken biryani. You’re gonna be spoilt for choice!
- Go ahead and serve it as it is! Garnish it with some more fried onions, cilantro and even toasted cashew nuts if you prefer. Make sure you serve it right from the Dutch oven if you can, using a long serving spoon that can remove deep portions of the butter chicken biryani so everyone gets all those layers!
- Remember that delicious marinated chicken we cooked at the very beginning of this recipe? You can have it as it is as a snack, or serve it as an appetizer. You can also spread that delicious flavorful chicken over a fresh salad with all your favorite veggies for a different exotic touch. You can also serve it with some biryani rice!
- Maybe you’re done cooking the butter chicken curry and it’s just incredibly delicious, you can’t proceed further? I understand. Go ahead and have the butter chicken curry on its own 🧈! That rich, creamy, slightly sweet slightly tangy butter chicken is too good to resist. I won’t judge! You can have it with butter naan, biryani rice, steamed plain rice or however you prefer.
- We know how delicious the biryani rice is in this recipe. I can’t stop myself from munching on a few grains right from when it’s cooked to when I start arranging everything together for the dum process. So, you can have the biryani rice on its own too. You can also have it along with the cooked marinated chicken we prepare in the very beginning. You can have it with the butter chicken curry too as well as with any other curry or dish you feel will go well with it. This Rich and Aromatic Indian Chicken Korma Curry Cooked in Yogurt and Easy Crispy Fried Indian Chicken Mixed with Tangy Sauce go exceptionally well with this rice as well!
- Another thing you can do is just skip out on the whole dum process (that makes this a biryani) if you’re incredibly hungry, in a hurry or just to change things up. Cook the biryani rice until it’s completely cooked and just serve it along with the butter chicken. It’ll taste scrumptious too (but hey, the richness added by the ghee, saffron milk and fried onions through the dum process makes this dish a biryani that can’t be beaten!).
- When you have traditional and authentic biryani, it’s usually served with a yogurt chutney. Most of the time, that’s to counter the spiciness that some biryanis hold. Today, it’s become more of a tradition and it’s served with biryanis that are not really spicy too. I have not made any yogurt chutney with our butter chicken biryani here because it’s not spicy at all and tastes amazing on its own but if you prefer having some yogurt chutney with your biryani, go ahead and serve it with this butter chicken biryani!
- Do you have a party coming up and want to impress your guests with a stunning Indian spread? Go ahead and make this Easy Crispy Fried Indian Chicken Mixed with Tangy Sauce as an appetizer, this Rich and Aromatic Indian Chicken Korma Curry Cooked in Yogurt along with butter garlic naan as an entry main course and this gorgeous butter chicken biryani as the main guy. Spread that table up with some scrumptious Indian food, it’ll draw Oohs and Aahs from all your guests. Yum yum!
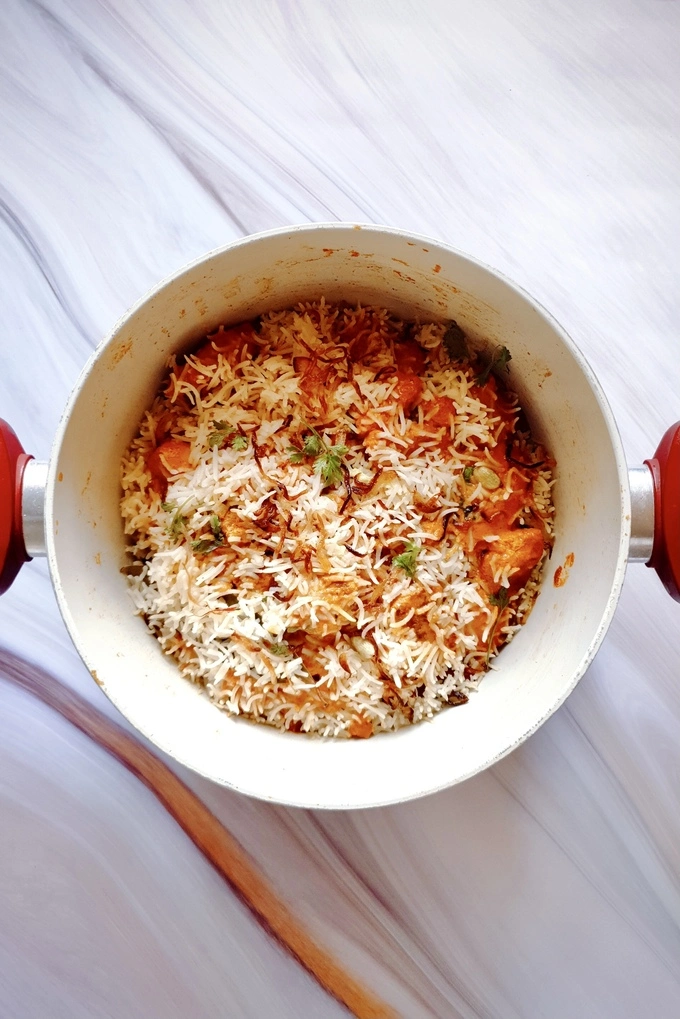
Frequently Asked Questions (FAQs)
Is butter chicken biryani sweet or spicy? Can I make this dish more or less spicy?
Butter chicken biryani isn’t spicy at all!
That’s what makes it a great beginner Indian dish too if you’re new to eating Indian food.
It can be a little sweet. I’ve added just a little sugar to our butter chicken curry for a touch of sweetness. It works so well with the rich, flavorful, silky creaminess of this dish, you have no idea!
You can use honey instead of sugar or skip out on this altogether if you prefer a sugar-free butter chicken curry.
To make your butter chicken spicy, you can add green chili peppers sliced in half, as many as you prefer.
You can also increase the amount of Kashmiri red chili powder used.
The amount of Kashmiri red chili powder we’ve used in this recipe doesn’t make the dish spicy at all but if you add some more, your dish can get a little spicy, so be careful.
Is butter chicken biryani difficult to cook?
Butter chicken biryani isn’t difficult to cook.
But hey, I’m not gonna sugarcoat things here. It is a little tricky to cook and takes quite a bit of time to prepare too.
I’ll help you with all the tricky bits though.
I always make sure I write detailed instructions because I don’t want to leave you guys to fend for yourself all alone in the kitchen.
So yeah, the tricky parts aren’t that tricky. You just need to be a liiiittle careful and I’ll help you with that.
Coming to it taking quite a bit of time to cook… This is an incredibly special recipe. And when it comes to special recipes like these, it’s okay if they take a little extra time to cook.
The result is worth it.
Choose a free-ish relaxing day to cook this recipe and most importantly, have fun cooking it.
Enjoy the process and it’s okay to get a little flustered and tired in between.
This dish will be so delish once it’s ready, you’ll forget the work you put into making it ❤!
How can I make my butter chicken biryani saucier?
Maybe you prefer a butter chicken curry with more curry because you prefer a saucier butter chicken or a saucier butter chicken biryani.
Never fear!
Just go ahead and add a few more tomatoes, onions, butter, garlic, ginger and water when you’re cooking the base of the butter chicken curry in Step 4. Adjust the seasoning accordingly too!
You can also just go ahead and double everything and cook some more butter chicken curry and keep some aside when you’re assembling the butter chicken biryani.
Then, once the dum process is over, you can serve your butter chicken biryani along with the extra butter chicken curry you saved earlier.
Do I need to use boned or boneless chicken when I’m cooking butter chicken curry?
You can use either boned or boneless chicken when you cook butter chicken. It all boils down to your personal choice, really.
The beauty of butter chicken is that you can use literally any cut of chicken and it’ll still taste absolutely delicious.
I prefer cooking my own chicken rather than using tandoori chicken (as I’ve shown in this recipe) and I prefer using chicken breasts cut into fat medium-sized cubes.
Some prefer using chicken thighs and some prefer using large pieces of boned chicken.
Others prefer shredding their chicken and some remove pieces of chicken from boned leftover pieces of tandoori chicken.
You can do whatever you prefer, really! There’s no right or wrong way. Your butter chicken will taste amazing either way.
What does butter chicken biryani taste like?
Butter chicken biryani tastes like one of those “where the heck have you been all my life?” dishes.
It’s… magical.
It has the right balance of everything.
It’s not too spicy at all but has those amazing Indian spices. Nor is it too sweet but has just the right amount of sweetness to it.
It’s buttery, creamy and incredibly flavorful from the butter chicken curry.
It’s aromatic, rich and gently spiced from the biryani rice.
And all those flavors intermingle together to give you a dish that’s buttery and creamy with the rich taste of saffron, ghee and fried onions… delicious marinated chicken and well… delicately spiced rice coated with that indulgent butter chicken curry…
It’s just… everything right ❤.
What is the difference between butter chicken biryani and regular biryani?
There are so many different types of biryanis out there but let me just go ahead and compare butter chicken biryani with biryani from Hyderabad, India- Hyderabadi biryani (some believe biryani originated here).
Hyderabadi biryani is also divided into two types- kacchi biryani and pakki biryani.
Kacchi biryani is biryani cooked by layering marinated raw meat in between rice and cooked in the dum process. It’s delicious but pretty difficult to cook.
Coming to pakki biryani, the marinated meat is cooked beforehand and then layered with rice that is almost cooked and then steamed together in the dum process.
We’ll compare our butter chicken biryani with Hyderabadi pakki biryani. That’s because kacchi biryani, as you can see, has a completely different cooking process altogether.
Coming to Hyderabadi pakki biryani, the meat most commonly used here is mutton. Also, this is a dish that literally originated, it’s said, in the mid-18th century. So it’s filled with so much history! It also uses a completely different marinade to coat the meat in. The ingredients used in preparing the meat curry are also completely different from butter chicken curry.
Butter chicken biryani is a super recent dish. It has no history that I know of and it just came to my mind as an idea one day after trying to recreate a butter chicken rice bowl I had while interning for a law firm! On researching more about it, I can see that it has been cooked by others too but it doesn’t have much history at all. It’s just mixing two super famous recipes together.
I have followed cooking the rice, the assembling process and ingredients used in the assembling process as well as the dum process sort of like Hyderabadi biryani here in this butter chicken biryani recipe because I saw my mum cooking biryani that way since I was a kid! I think that’s what gives the rice that biryani rice taste. But that’s where the similarity ends between these two recipes.
They are pretty different recipes and shouldn’t be compared.
What to serve with butter chicken biryani?
Butter chicken biryani tastes amazing on its own. Everything just works perfectly together.
But if you would like to get some ideas on how to serve it and what to serve along with it, go ahead and check out our Serving Suggestions above!
Can I cook this butteriest scrumptious butter chicken biryani recipe in advance? How do I store and reheat it?
Yes, you can cook this delicious butter chicken biryani in advance.
There are multiple things you can do. Here are a few ideas:
- You can cook the fried onions, the butter chicken curry as well as the biryani rice in advance. You can store these dishes in separate air-tight boxes for about 3 days. On the day you want to serve this dish, just go ahead and assemble everything following Step 7 in the instructions and then keep the layered butter chicken and biryani rice for dum like in Step 8!
- You can also just go ahead and cook the entire butter chicken biryani and store it in an air-tight box in the fridge for up to 3 to 4 days. I love keeping the layers of my biryani intact in case I’m serving this dish to guests so I usually just go ahead and wrap the top of my Dutch oven with some cling wrap and store my butter chicken biryani in the fridge that way. When I need to reheat it, I just follow the dum process again and cover and steam my butter chicken biryani on low heat for about 10 minutes or until it’s completely heated through. This also results in an extremely flavorful butter chicken biryani because there’s more time given to the dish to absorb and develop its flavors further.
How do I reheat leftover butter chicken biryani?
It’s pretty easy to reheat this scrumptious butteriest butter chicken biryani!
If you have leftover butter chicken biryani, you can just heat it in the microwave.
Or you can use a wok, skillet or Dutch oven and heat your butter chicken biryani in it until it’s heated through.
Can I make this butteriest scrumptious butter chicken biryani according to my diet preference?
Yes, you can make this easy butter chicken biryani recipe according to your diet preference!
Explore the Variations Section above to see our suggestions on how you can make the vegetarian version of butter chicken biryani, dairy-free butter chicken biryani, gluten-free butter chicken biryani, nut-free butter chicken biryani and the vegan version of butter chicken biryani.
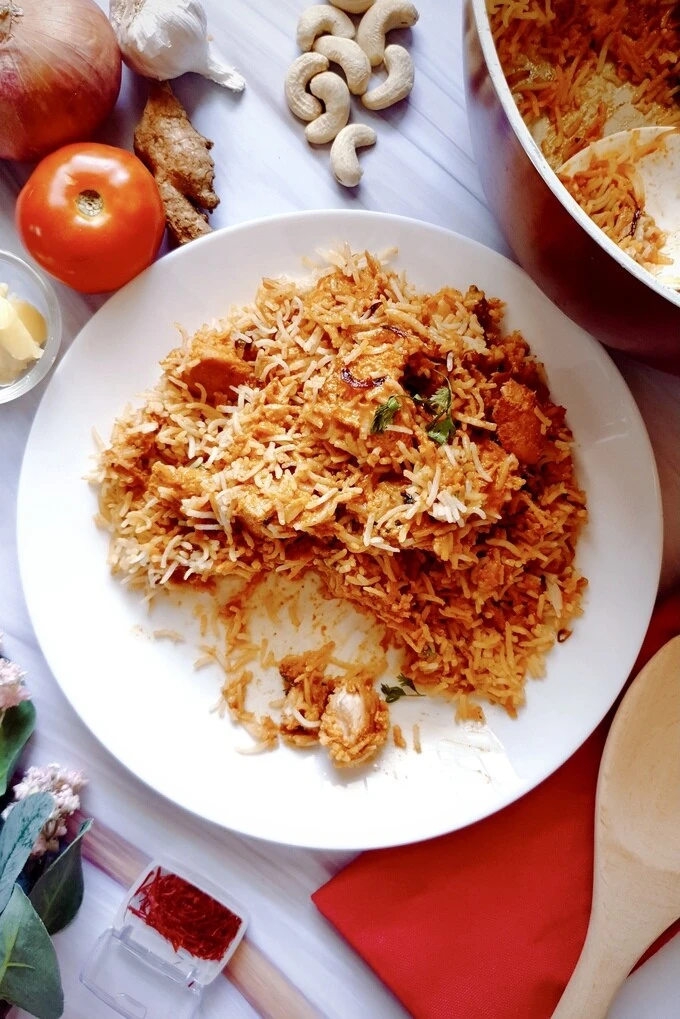
❤❤❤
Hey you, I really hope you love this butteriest scrumptious butter chicken biryani recipe as much as I do!
If you do, I would appreciate a star rating SO much (you can rate this recipe right below or from the Recipe Card 💖).
You have no idea how happy it’ll make me and how much of a boost it gives us here. It’s the best feeling ever when you see someone appreciate something you’re passionate about.
Please also let me know in the comments below if you’ve tried this recipe and loved it or have any suggestions regarding it. I would love to hear all about it!
I hope you make the best memories ever with this recipe and all the recipes here on The Buttery Fairytale ✨.
We would love to get to know you better, say hello in the comments below ❤
Don’t forget to Subscribe to our Newsletter for more personalized conversations and exclusive interactions.
Also, keep in touch and follow us on Pinterest, Instagram and Facebook!
If you make this recipe, please post a picture of it and tag me on Pinterest or Instagram @thebutteryfairytale. You can also hashtag it with #thebutteryfairytale. I LOVE seeing your recipe creations and seeing you create our recipes is… the best feeling in the whole world! 😊💖
Would you like to explore more such recipes? Check out our collection of absolutely lip-smacking Main Dish, Rice and Fall recipes.
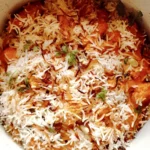
BUTTERIEST Scrumptious Butter Chicken Biryani Recipe
Ingredients
To marinate the chicken:
- 1 lb or 454 gms chicken breast skinless and boneless, cut into fat medium-sized cubes (can use boneless chicken thigh as well)
- ½ tbsp garlic paste (or you can make your own paste out of 5-6 medium-sized peeled garlic cloves by grinding them with 1/2 tsp of water)
- ¼ cup or 70 gms Greek yogurt (can substitute with plain whisked yogurt)
- ¼ cup or 60 ml heavy cream or light cream
- ½ tbsp Kashmiri red chili powder
- ½ tsp ground coriander
- ½ tsp ground cumin
- ½ tbsp lemon juice (can substitute with lime juice)
- ½ tsp salt or according to your preference
- ¼ tsp black pepper or according to your preference
To fry the onions:
- 4 tbsp neutral cooking oil
- 1 medium-sized or 170 gms onion thinly sliced
- a pinch of salt
To cook the chicken:
- the previously marinated chicken
- 1½ tbsp butter
- 1 tsp onion oil from the onions we fried earlier
To make the base of the butter chicken curry:
- 1 medium-sized or 170 gms onion roughly chopped
- 8 to 10 cashew nuts
- 1½ cups or 355 ml water
- 1 large or 200 gms tomato roughly chopped
- 2 inch ginger peeled
- 5 to 6 medium-sized cloves of garlic peeled and lightly smashed
- 3 tbsp butter
- 1 tbsp Kashmiri red chili powder (you can use 3/4 or even 1/2 tablespoon of Kashmiri red chili powder if you find 1 tbsp too spicy for your taste, your butter chicken may be a lighter color though if you use less of this spice so keep this in mind)
- 3 cloves
- 2 inch cinnamon stick
- 2 bay leaves
- 2 whole green cardamoms
- ½ tsp salt or according to your preference
- ¼ tsp black pepper or according to your preference
To finish cooking the butter chicken curry:
- 2 tbsp butter
- 2 medium-sized cloves of garlic peeled and smashed, can also mince finely for a smoother sauce
- ½ tsp Kashmiri red chili powder
- 1 tsp ground coriander
- the previously blended and strained butter chicken sauce
- previously cooked chicken
- 3 tbsp heavy cream or light cream
- 1½ tsp sugar or according to taste (can substitute with honey)
- 1 tsp dried fenugreek leaves
To cook the rice:
- 3 cups or 710 ml water
- 1½ tsp salt or according to your preference
- 1 tsp ghee
- 3 cloves
- 3 whole green cardamoms (or 1/4 tsp ground cardamom)
- 1 two-inch cinnamon stick (or 1/4 tsp ground cinnamon)
- 2 bay leaves
- 1½ cups or 240 gms Basmati rice (can substitute with Sella Basmati rice, Jasmine rice or any type of American long-grain white rice)
To assemble everything together:
- the partially cooked biryani rice
- 9 to 10 threads of saffron
- 4 tbsp milk
- 2 tbsp ghee
- the previously cooked fried onions
- the previously cooked butter chicken curry
- fresh cilantro leaves plucked from 2 sprigs
The dum process:
- the assembled butter chicken biryani
( Note- Please keep in mind that I go into lots of detail in all my recipes so you get to know all the super important tips & tricks when it comes to making a particular recipe. I always want you to make the BEST of whatever you’re cooking ❤ )
Instructions
- Okay guys, we’re doing this. Get ready!It’s time to make one of the most gorgeous, interesting and fun to make recipes out there.There are eight major steps in this recipe and the instructions have been given according to each of these steps.The 8 steps involved in making this recipe are:1) Marinate the chicken2) Fry the onions (also called Birista)3) Cook the chicken4) Make the base of the butter chicken curry5) Finish cooking the butter chicken curry6) Cook the biryani rice7) Assemble the biryani8) The Dum processDon’t worry, cooking this dish is incredibly fun and I’ve also tried being super clear and detailed in the instructions below to make things easier for you guys.If you have any questions, just ask in the comments below. I’ll reply as soon as I can!Try and get all the ingredients ready for each step beforehand too. It’ll make things easier.Let's begin!MARINATE THE CHICKENCut 1 lb or 454 gms chicken breast into fat medium-sized cubes.Then, transfer the chicken cubes to a bowl.Now, add in all the ingredients needed for marination to your chicken like: ½ tbsp garlic paste, ¼ cup or 70 gms Greek yogurt, ¼ cup or 60 ml heavy cream or light cream, ½ tbsp Kashmiri red chili powder, ½ tsp ground coriander, ½ tsp ground cumin, ½ tbsp lemon juice, ½ tsp salt and ¼ tsp black pepper.Rub those spices, that Greek yogurt… cream all over the chicken cubes. I always suggest you go in with your hands if you can. You can get into all those tiny chicken bits easily that way.You can use gloves too, if you prefer.Once you’re done mixing everything together, go ahead and wrap the bowl with some cling wrap.You can use an airtight container or zip-lock bag too.Move your bowl of chicken to the fridge and let it marinate for at least an hour. But the more you marinate it, the better.Overnight is ideal though.This marinade makes the chicken absolutely amazing.Once again, please try and let your chicken marinate for more than an hour if you can. But if you’re in a hurry, you can wait just an hour.
- FRY THE ONIONS (ALSO CALLED BIRISTA)Okay you, this is a super easy process. BUT you need to keep a constant check on your onions because it takes literal seconds for the onions to go from ahh so delicious and pretty 😍 to oh my goodness they’re burnt 😱!Trust me though, if you keep a constant check here, especially once your onions start browning, you’re safe ❤.A small tip– The onions need to be thinly and uniformly sliced for even frying. Please keep in mind though that the onions should not be reallyyy thinly sliced. That’s because we don’t want them to get really crispy and we want them to retain that deep delicious rich oniony flavor because it’ll taste amazing in our butter chicken biryani. Onions fried this way taste really good with practically any type of biryani. You can check how I sliced my onions to understand better in the pictures here above! But if you prefer super crispy onions in your biryani without too much of that deep onion taste, you can slice your onions even thinner and deep fry them instead until they're crispy.Now…Once you’re done marinating your chicken, remove it from the fridge so it reaches room temperature while you cook your onions.Also, if you’re cooking this recipe in one pot, like me, make sure you use a Dutch oven. With a lid!So, in your Dutch oven, pour in 4 tbsp neutral cooking oil and let it heat over medium-low heat.Once the oil is heated through, add in your sliced 1 medium-sized or 170 gms onion and a pinch of salt too.The salt will help draw the moisture out from your onions. This will lead to faster browning.Now, just have fun sautéing your onions!Cook your onions for about 20 to 25 minutes. I know, I know, this may seem like lots of time but it’s incredibly worth it! Please do NOT try hurrying up and increasing the heat here or you may burn your onions.When your onions are in the pan, sizzling, after about 18 to 23 minutes, you may notice them turning a golden brown.This is an important stage. That’s because once your onions start browning, they’ll start browning incredibly fast.Keep a close check on them and once they turn a gorgeous deep golden brown (not light brown), strain and remove them (keep that oniony oil safe).Keep in mind that your onions will continue to cook a little more once you remove them which means they'll turn darker.Remove your onions when they turn a deep brown. They shouldn’t be a dark almost black brown.Once again, strain your sliced onions in a strainer first and keep the remaining oniony oil in the Dutch oven to use later.Then, spread those gorgeous fried onions on a plate with paper towels on it to absorb the excess oil from them, if any.While removing your onions, if you feel there are a few slices of onions that haven’t browned much, let them stay in the pan and remove the other onion slices that have already browned, if you can.Try and remove the browned onions as fast as you can though because the already browned onions will continue to cook and brown a little more once you remove them too. That means they’ll get darker.If that’s a little difficult to do and you see there are more browned onions than those that aren’t completely browned, just go ahead and remove all your onions. A few light golden onions here and there won’t matter.So yes, that’s done with!Now give yourself a pat on the back.Browning onions is one of the major steps involved in making Hyderabadi Biryani (which is literally THE MAIN biryani out there, it’s believed all other biryanis came from it).Browning your onions just right is a *big deal*, and you’ve done it ✨!Now, there’s another gorgeous ingredient in the Dutch oven. That’s your fried onion oil!It needs to be in the Dutch oven for the next step.Strain this onion oil and then pour 1 tsp onion oil of it back into the Dutch oven.
- COOK THE CHICKENIt's time for one of the most delicious parts of this recipe…The CHICKEN!To that delish onion oil in your Dutch oven… add in 1½ tbsp butter.Raise the heat to medium-high.Stir until the butter melts and mixes in with that onion oil. Now, once the oil and butter are heated through, add in the previously marinated chicken, those scrumptious marinated chicken cubes yummm. DON'T add in the marinade with the chicken.If they don’t fit all at once, cook in batches and don’t overcrowd the pan! That's so all your pieces of chicken cook evenly and form that scrumptious crust. If you add all your pieces of chicken together, you won’t get the crust we’re going for and your chicken will steam instead. We don’t want that.Now, cook those fat cubes of chicken for about 5 to 6 minutes on one side.Please keep in mind that the cooking time may vary depending on how much chicken you have in your cooking pot, the size of your chicken cubes, how much marinade went in with the chicken, the cooking pot you’re using and your stove.Once 5 to 6 minutes have passed, using tongs if you can (they make things so much easier), gently turn and check one of the chicken cubes to see if it has browned and formed a nice reddish-brown crust.If not, cook just a little more until that side of your chicken cubes turns reddish brown and is cooked.Once the chicken browns well on that side, go ahead and turn the chicken cubes and cook them for another 3 to 4 minutes until they form a gorgeous reddish-brown crust on the other side too.Turn the chicken cubes again once those 3 to 4 minutes are up, they may be nice, cooked and browned by now.Then, reduce the heat to low.Check all your cubes of chicken. There may be some sides that haven't browned enough.Turn your cubes of chicken to the least browned side.And then, cover the Dutch oven and let the chicken cook over low heat for about 5 minutes. This extra step will make your chicken cubes tender and juicy 😍!Once 5 minutes are up, remove the chicken cubes.If you want a little char (like tandoori chicken), you can always cook your chicken a little extra over high heat so it browns a little more. Slightly charred chicken tastes amazing in this recipe.Now, add a teaspoon of butter to the Dutch oven and cook the next batch of chicken the same way.The second batch may also cook much faster so keep a check!And hey, don’t get rid of anything in the Dutch oven once you’re done cooking your chicken.This is a one-pot meal and every single ingredient in that Dutch oven matters because it’s all contributing to the most amazing flavors EVER! And those cooked browned chicken bits stuck to the bottom of the pan? They're gonna add the most gorgeous flavors to our butter chicken curry!Go ahead and try a piece of that chicken now. Doesn’t it taste incredible ❤?HIDE those pieces of chicken (so you don’t attack them. I know I can’t stop myself, it’s insane!) and jump to the next step.
- MAKE THE BASE OF THE BUTTER CHICKEN CURRYWe’ll now make the base of our butter chicken curry.In the same Dutch oven, over low to medium-low heat, add in roughly chopped 1 medium-sized or 170 gms onion and 8 to 10 cashew nuts.Sauté them for about 2 minutes until the onions are softened just a little bit.Mix those onions and cashew nuts well with all those delicious cooked chicken bits stuck to the bottom of the Dutch oven! The flavor this adds is… ✨!Please make sure you don’t cook the onions for more than 2 minutes.If the onions start cooking and turn golden brown (on their own, not because of the chicken bits), your butter chicken sauce may not get that characteristic deep reddish-orange color.Now, add in 1½ cups or 355 ml water along with all the other ingredients given under this step like– 1 large or 200 gms tomato, 3 cloves, 2 inch cinnamon stick, 5 to 6 medium-sized cloves of garlic, 2 inch ginger, 1 tbsp Kashmiri red chili powder, 2 bay leaves, 2 whole green cardamoms, 3 tbsp butter, ½ tsp salt and ¼ tsp black pepper.Gently mix everything together.Now, raise the heat to high and bring everything to a boil.Once everything comes to a boil, cover the Dutch oven, reduce the heat to medium-low and cook for at least 12 to 15 minutes.*While you wait for that butter chicken base to cook, go ahead and wash (at least thrice or until water runs clear) and soak your rice so it’ll be ready in time once we are done cooking our butter chicken curry.*Anyway…You need to cook everything until the tomatoes and onions are soft, mushy and cooked through.Once 12 to 15 minutes are up, lift the lid and with your ladle, try and smoosh the tomatoes (if it's not easy to smoosh them, cover and cook the mixture until the tomatoes mush easily).If those tomatoes are mushy and easily crushed, your butter chicken base is ready to be blended!Please let the mixture cool down completely before you blend it.Also, remove the cinnamon stick, bay leaves, cardamoms and cloves before you blend this mixture.Dispose of these spices before blending and don’t add them back to the butter chicken sauce once it’s blended.Once again, blend only once the mixture is at room temperature or even cooler.If you go ahead and blend the hot mixture immediately, the blender may explode because of all the heat and steam so *please be careful*!Blend everything into a fine smooth sauce.Now, strain it and set it aside in a separate bowl!Straining the butter chicken sauce will give you that characteristic smooth, silky, soft butter chicken sauce. It’s shining ✨!Let's move to the next step!
- FINISH COOKING THE BUTTER CHICKEN CURRYNow, in the same Dutch oven, add 2 tbsp butter and smashed 2 medium-sized cloves of garlic and sauté for a minute on medium-low heat.Then, add ½ tsp Kashmiri red chili powder and 1 tsp ground coriander to the garlic-infused butter.Gently mix everything together and let that garlic, Kashmiri red chili powder and ground coriander cook well in that butter for a minute or two.Then add the previously blended and strained butter chicken sauce to it.Stirrrr incredibly well for another minute or two.Let all those amazing flavors mix together ✨.Then, add in those delicious juicy previously cooked chicken cubes to the smooth scrumptious butter chicken sauce. Mix everything together.Let the chicken lend its scrumptious flavors to the butter chicken sauce and absorb that amazing buttery tomatoey-ness in the process too.It’s an absolutely gorgeous intermingling of flavors!Stir it all together for about 2 minutes, and then add in 3 tbsp heavy cream or light cream and 1½ tsp sugar. Once again, gently mix everything together.Give your butter chicken curry a taste. Add in more sugar if you prefer.Then reduce the heat to low, cover the Dutch oven and let your butter chicken curry cook for about 5 minutes.Once 5 minutes are up, gently lift the lid and give your butter chicken curry another taste. If you feel there needs to be more sugar, salt or pepper, add it in.And then, add in crushed 1 tsp dried fenugreek leaves.Gently stir and switch off the heat. Remove your butter chicken curry in a separate bowl and set it aside.Go ahead and give it a nice taste. You’ve just tried one of the most delicious, indulgent, scrumptious dishes in the whole world.And you made it! How awesome are you, huh? 🤩 Let’s move to the next step!
- COOK THE BIRYANI RICEYour rice may have been soaking for at least half an hour at this point if you kept it for a good soak in Step 4 like I asked you guys to!Now, in the same Dutch oven, pour in 3 cups or 710 ml water. Add in the 1½ tsp salt, 1 tsp ghee, 3 cloves, 3 whole green cardamoms, 1 two-inch cinnamon stick and 2 bay leaves. Salt is incredibly important when making biryani rice. We do not want bland biryani rice! The amount of salt you add needs to be just right.Go ahead and taste the water before you bring it to a boil. The water shouldn’t be too bland, nor should it be too salty. It needs to taste just right.Now, raise the heat to high and bring the water to a boil.Once the water is boiling like what the heck!?!? 😱, add in 1½ cups or 240 gms Basmati rice.Let the rice boil for about 2 minutes. We need this to happen because when our Basmati rice hits hot boiling water, it immediately puffs up and increases in size. This gives our rice grains a gorgeous size and shape.Be careful here though because if you boil your rice for a little more than 2 minutes, your rice grains may start to break.After 2 minutes of boiling your rice, reduce the heat to low.Cover the Dutch oven and cook the rice for about 6 to 7 minutes. *While your rice cooks, you can go ahead and warm 4 tbsp milk. Add 9 to 10 threads of saffron to it to give it some time to infuse for the next step.*Please keep in mind that the amount of time you need to cook differs from one type of rice to another. Even if you're using the same type of rice as me (Basmati), the time you need to cook it until it’s 80 to 90% done will differ from literally one brand to another.I’ve given the time and method I’ve used to cook my rice here to give you guys a bit of an idea and to help with any confusion you may have.BUT… Please try and follow the package instructions for the rice you use and cook just a little lesser than the time they’ve asked you to cook it for. The rice needs to be 80 to 90% cooked. That’s my advice ❤.Anyway…Once 6 to 7 minutes are up, try a grain of rice. It should be cooked about 80 to 90%.The rice grain shouldn’t be overcooked and shouldn’t be incredibly undercooked either. It should have just a little bite to it and should be almost done.If your rice grain has a pretty hard bite to it, go ahead and cook your rice for a few minutes until it's just almost done. Or if you squish the rice grain between your fingers and it turns mushy easily, your rice may be overcooked. And don't worry, we have a few tips on what you can do with overcooked and undercooked rice below!Your rice needs to be 80 to 90% cooked because the rest of it will cook during the Dum process which is the last step of this recipe. Drain your rice immediately. That's because the longer your rice stays in the water, the more it’ll cook.Set the rice aside and keep your Dutch oven where it is! We’re using it in the next step too.And hey. don’t worry if your rice is overdone or underdone. Your butter chicken biryani will still taste incredible ❤.But here are some helpful tips too:If you feel your rice is mushy and overcooked in any way, it's absolutely okay! Don't worry at all and try doing the following:– Lay your rice out flat over a plate or tray in a thin layer so it loses some of its moisture and doesn’t continue to cook in its own heat. This will help your rice dry out a little too. It will also prevent the rice grains from squishing against each other becoming a mushy mass.– Once your rice cools down, go ahead and gently layer it with the butter chicken in the next step and then reduce the amount of time it steams for during the dum process (the last step). If you feel your rice is incredibly dry and completely cooked through: Just go ahead and reduce the dum time in the next step. Don’t worry about the rice being really dry because it will absorb all that butter chicken curry and will soften up nice and good in the process.If you feel your rice is undercooked: If you feel your rice has a pretty hard bite to it, you can cook it for a few more minutes. But if you’ve already drained your rice…– Sprinkle just a little water over every layer of rice you make during the biryani assembling stage (the next step). – Also, steam your biryani a little longer in the dum stage. – You can use a slightly damp wet cloth, wrap it under the lid and then place it over the Dutch oven to help add more moisture to the rice while it steams in the dum stage. And hey, don’t worry too much about the doneness of your rice. This recipe will still be incredibly delicious, so don’t sweat it too much!
- ASSEMBLE THE BIRYANIYahoowee! Now’s the fun part.Everything’s cooked and ready. We just need to bring all of it together. And how much fun is that, huh?!Go ahead and keep all the ingredients ready for this step…– the partially cooked biryani rice,– the saffron milk,– 2 tbsp ghee,– the previously cooked fried onions at the very beginning,– the previously cooked butter chicken curry ,– and fresh cilantro.If you haven’t made your saffron milk in the previous step like I asked you to, go ahead and make it right now.Warm 4 tbsp milk and add 9 to 10 threads of saffron to it. Gently stir it all together.Anyway, getting back to the biryani… keep in mind that I've made multiple layers here.You don’t have to do that. You can follow any way you prefer. Three layers– rice, butter chicken, rice (spreading the ghee, saffron milk, fried onions and cilantro over each layer of rice every time).Five layers– rice, butter chicken, rice, butter chicken, rice (spreading the ghee, saffron milk, fried onions and cilantro over each layer of rice every time).Seven layers (like I do here)- rice, butter chicken, rice, butter chicken, rice, butter chicken, rice (spreading the ghee, saffron milk, fried onions and cilantro over each layer of rice every time).Make sure you add just enough of each ingredient to keep the rest of it ready for the next layer.If you have any extra ingredient left, don’t worry, you can pour all of it over the last layer of rice on top (except the butter chicken, you need to finish it before adding the last layer of rice on top)!Let’s begin!The pictures here will help a lot in case you're confused and if you still have any questions, ask me in the comments below!FIRST:Using the same Dutch oven, take some rice and spread a thin layer of it on the bottom. This is gonna be the base of our butter chicken biryani.Then, spread and pour some saffron milk over it.And spread some ghee.Sprinkle some fried onions.And then spread some butter chicken curry over it.Then, sprinkle some fresh cilantro leaves.SECOND:Now, cover it all with another thicker layer of rice.Spread and pour in some saffron milk, ghee and sprinkle some fried onions over it.Then spread the butter chicken curry once again all over it and sprinkle some fresh cilantro leaves.THIRD:Cover the butter chicken curry with another layer of rice. Save some rice for the final layer.Once again, spread and pour in the saffron milk and ghee.Sprinkle a few fried onions over it all.Save some saffron milk, ghee and fried onions to use for the last layer.Spread the butter chicken curry over everything and finish all of it.Sprinkle some fresh cilantro leaves and keep some aside for the last layer.FOURTH AND LAST:Spread the remaining rice all over the butter chicken curry.Spread and pour all of the saffron milk and ghee over the rice.Sprinkle the rest of the fried onions and fresh cilantro leaves over it too. Cover all of it with your Dutch oven’s lid and move on to the next step!
- THE DUM PROCESS:We're literally minutes away from eating this gorgeous dish we worked so hard on!Let me tell you guys what to do here before talking a little about the dum process.First of all, cover your Dutch oven.You can use just your lid to cover your Dutch oven but you can also wrap a cloth under your lid and then place it over your Dutch oven.You can also place some raw dough around the opening of your Dutch oven and then place your lid over it to seal it completely. This is traditionally done when cooking biryani.Now, take your covered Dutch oven with the assembled butter chicken biryani in it and place it on the stove over low to medium-low heat.My suggestion to you guys here is to use the small-sized burner on your stove for the dum process.You can use a medium-sized burner too.If your burner is large, you run the risk of burning your butter chicken biryani during the dum process.If you can use only a large-sized burner though, place a flat pan over it. And then place your Dutch oven over it and let it steam over low heat.The main thing here is to let your biryani steam over low to medium-low heat.If you’re using a small-sized burner: steam for 25 to 30 minutes.If you’re using a medium-sized burner: steam for 20 to 25 minutes.If you’re using a large-sized burner: steam for 15 to 20 minutes over LOW heat.You can also cook for slightly longer if you prefer the rice to crisp up at the bottom. I love when this happens! That crispy crust of rice is… 💖. You’ll learn with experience how long this will take according to the cooking pot you use and your stove.The time I’ve given above is a safe bet and with time, you’ll understand what works best for YOU according to the end result you expect from your butter chicken biryani.Let's talk about the Dum process a little now.Dum is a process in which the cooking dish is sealed and placed over a low flame. The food then steams within the cooking pot and cooks that way. It's an incredibly important step when making biryani.During the dum process, our butter chicken curry absorbs all those gentle spices and flavors from the rice, as well as the ghee and saffron milk.Our biryani rice absorbs all that buttery deliciousness from the butter chicken, that rich creaminess… all of it. As well as the ghee, the saffron milk and the deep flavors of those delicious fried onions too.Anyway, once the time is up, switch off the heat and gently lift the lid off your butter chicken biryani after it's cooled a little. Take in all that scrumptiousness…AND WE’RE DONE ✨.You’ve created one of the most delicious dishes in the whole world. Go enjoy it and be super proud of yourself because this wasn’t an easy dish to cook and YOU cooked it!Serve your buttery lush butter chicken biryani nice and hot, don’t mix all of it together and use a long serving spoon to remove every layer right from the top to the bottom when serving it 😍!
Notes ✍🏼
- This recipe requires patience. It’s not a quick recipe and trying to hurry things up won’t let this recipe cook to its maximum potential.
- Get all your ingredients ready beforehand and if you can, divide them according to each step as well, so you don’t get confused while cooking.
- Go ahead and cut your chicken into fat juicy medium-sized cubes. Then, rub all that amazing marinade on your chicken cubes by hand, if you can. I know it’s a bit of a task but you’re the only one who can get all those spices in those hard-to-reach chicken places! You can wear disposable gloves and do this too.
- Marinating your chicken overnight is one of my biggest suggestions here. It tastes amazing when it’s marinated overnight 😍. If you’re really short on time though, marinate your chicken for at least an hour.
- Remove your marinated chicken from the fridge and keep it outside while your onions cook so your chicken can come close to room temperature. This will help your chicken cubes cook more evenly.
- Add just a pinch of salt to your onions while they’re sizzling in the oil. This will bring the moisture out in them which in turn will help in quick browning!
- I prefer my fried onions in biryani to be richer in taste than normal crispy deep-fried onions, so I cut them thin but not really thin and sauté them until they reach a deep brown and smell absolutely delicious. This method goes super well with biryani and keeps a deep oniony delish taste too. If you prefer crispier onions though, slice your onions super thin and deep fry them.
- You can also skip on the cashew nuts if you don’t have any at home. Cashew nuts make our butter chicken curry lush and give a gorgeous rich taste too. But if you don’t have any, don’t worry because the butter and cream will work their magic and give you a rich curry!
- Remove the cinnamon, cloves, bay leaves and cardamoms before blending everything together in Step 4.
- Kashmiri red chili powder gives our butter chicken curry that amazing red color and adding in cream gives it that characteristic deep reddish-orange color. If you prefer a darker red butter chicken curry though, you can add in some more Kashmiri red chili powder or even red food color to the butter chicken curry. I don’t prefer doing this and prefer getting that color from the Kashmiri red chili powder. Be careful with the Kashmiri red chili powder though because adding in too much may make your butter chicken curry a little spicy.
- Make sure you wash your rice really well at least 3 to 4 times. This helps remove extra starch from the rice. It also leads to your grains not sticking to each other and being separate and fluffy after cooking.
- And then, make sure you soak your rice for 15 to 20 minutes but not for more than an hour. Soaking your rice leads to a lot of good things. It helps the rice cook faster because the rice already starts absorbing water. It also helps your rice keep most of that aroma even once it’s done cooking. There are so many more advantages to it that you can read on as well ❤!
- Salt is incredibly important when making biryani rice. Add in the salt to your water and give it a taste before bringing it to a boil. The water shouldn’t be too bland, nor should it be too salty. It should taste just right.
- When cooking your rice, follow the instructions given on the package whether you’re using Basmati rice or not. That’s because every rice brand and type cooks differently. So even if you’re using Basmati rice like me but of a different brand, your rice may take a different amount of time to cook. You can refer to the instructions I have given here but the best thing to do would be to follow the package instructions of the rice you’re using. The main thing you need to know is that the rice should be cooked 80 to 90% and should have a very tiny bite to it. Cook just a little lesser than the time suggested by the rice brand you’re using. There needs to be a little bite to the rice. It should be almost done.
- Also, once your rice is 80 to 90% done, strain it immediately so it stops cooking. The longer your rice remains in water, the more it’ll cook!
- If your rice is overcooked, what you can do is lay your rice out flat over a plate or tray in a thin layer so it loses some of its moisture and dries out, doesn’t squish in with the other rice grains and also doesn’t continue to cook in its own heat. Once it cools down, go ahead and gently layer it with the butter chicken and then reduce the amount of time it steams for during the dum process.
- If your rice is undercooked, you can sprinkle just a little water over every layer of rice you make during the biryani assembling stage. Along with that, steam your biryani for a little longer in the dum stage. You can also use a slightly damp wet cloth, wrap it under the lid and then place the lid over the Dutch oven to help add more moisture to the rice during the dum process.
- And hey, not a tip. I just want to let you guys know that it doesn’t matter how cooked, overcooked or undercooked your biryani rice is. It’ll taste amazing anyway and we all learn from experience, right? So don’t sweat it ❤.
- To prepare your saffron milk for the layering and dum process, make sure you add your saffron threads to warm milk a little earlier to give it time to infuse. This will help open up your gorgeous saffron threads getting all that deep flavor and amazing aroma out!
- During the dum process, use the small-sized burner on your stove. The dum process is supposed to take place over a small to medium-sized burner over low to medium-low heat. If your burner is large, you may burn your butter chicken biryani. If you can only use the large burner on your stove though, go ahead and place a flat pan over it and then place your Dutch oven over it and let it steam on low heat.
- During the dum stage, you can wrap a cloth under your lid and place it on the Dutch oven. You can also line the top of your Dutch oven with some raw dough and then place your lid over that! I’ve only used my lid here but you can use your imagination and have fun with the dum process. This is to prevent any steam from escaping from the Dutch oven.
- Remove the whole spices from the butter chicken biryani before serving it, if you can. That stray cardamom in a nice scrumptious bite ruins things for a millisecond or two and we don’t want that!
- Don’t mix the rice and butter chicken curry together once the butter chicken biryani is done with the dum process. Don’t do this while serving either. Instead, remove each serving of the butter chicken biryani using a long serving spoon or similar, that can get all the way to the bottom of the Dutch oven and remove all the layers of the biryani in one go for each serving. Biryani is assembled in layers for a reason! Let the biryani remain as it is so the longer it stands, the more flavors are absorbed by the rice and butter chicken curry equally.
- You can also cook the onions, the chicken, the butter chicken curry and the rice separately in different pans if you’re in a hurry. Use a Dutch oven when it comes to the last dum stage though. Dutch ovens are heavy-bottomed which means your rice will be less susceptible to sticking on the bottom during the dum step (I love a little stuck rice though!). Dutch ovens are also deep and have the right shape to keep the steam inside themselves during the dum process which will result in even steaming all over.
- In this recipe, you can increase or decrease the amount of chicken or rice used too. If you prefer more buttery butter chicken curry in your butter chicken biryani, just increase the amount of butter chicken you make and reduce the amount of biryani rice. If you prefer more of that rich aromatic biryani rice and less of the butter chicken, go ahead and increase the amount of rice and reduce the amount of butter chicken you make. In this recipe, I’ve given a butter chicken to biryani rice ratio that I feel is best but you don’t necessarily have to agree 😉. You can make it the way I’ve given here first and then go ahead and increase or decrease the butter chicken or biryani rice according to your preference the next time you cook this recipe!
- I prefer my fried onions in biryani to be richer in taste than normal crispy deep-fried onions, so I cut them thin but not really thin and sauté them until they reach a deep golden brown and smell absolutely delicious. The method I’ve given goes super well with biryani and keeps a deep oniony delish taste. If you prefer crispier onions though, just go ahead and slice your onions super thin and deep fry them.
- You can also use bone-in chicken or chicken thighs. The cooking time will vary though so keep a close check!
- Got some leftover tandoori chicken from last night’s Indian takeout? Go ahead and use it in this butter chicken recipe instead of cooking your own chicken. Or maybe just order in some tandoori chicken. Take the meat out from the pieces of chicken and add it to the butter chicken curry here. That will make for an interesting variation (but hey, our chicken recipe here is incredibly delicious, nothing can beat it 😍).
- You can also try cooking your marinated chicken in a different way. You can grill it, bake it or even barbecue it before adding it to the prepared butter chicken sauce.
- You can use a different meat too, if you prefer. I know the dish is called butter chicken but trust me, different meats work really well here! You can use shrimp, fish or maybe even lamb. Use the same marinade we’ve given here. The cooking time will vary depending on the meat used so cook accordingly.
- Another interesting thing you can do here is, marinate your favorite veggie/veggies (such as potato or maybe even cauliflower) in the same marinade we’re using for the chicken. Marinate your veggies in a separate bowl from the chicken though. Then, go ahead and cook your veggies before cooking the chicken. Then add them to the scrumptious tomato onion butter chicken sauce along with the chicken to have a delicious butter chicken and vegetable curry.
- I know it’s called butter chicken biryani but if you prefer, go ahead and cut down on the butter. Try not to remove it completely, just use a little lesser butter than the amount I’ve asked you to use. It’ll still taste incredible!
- And if you’re in the mood for an indulgent meal, go ahead and add even more butter, if you prefer. It’ll just be butterier and absolutely… incredible!
- You can also skip out on the cashew nuts if you don’t have any at the moment. Cashew nuts add a nice thickness to our butter chicken curry and give a gorgeous rich taste too. But don’t worry, the butter and cream will work their magic and give you a lush curry!
- You can add some honey instead of sugar to the butter chicken curry, if you prefer.
- I’ve used light cream with a fat percentage of 25% but you can use heavy cream too for a richer, creamier taste!
- You can use cream with a lower fat percentage as well!
- If you prefer a thinner butter chicken curry, just go ahead and add a little more water in the beginning when you’re making the base of the butter chicken curry (in Step 4).
- And if you prefer a thicker butter chicken curry, reduce the amount of water added in the beginning when you’re making the base of the butter chicken curry (in Step 4). You can also let the sauce evaporate a little more after adding it back to the Dutch oven in the next step (in Step 5) after blending it.
- A different type of rice can be used too! I’ve grown up eating biryani made using Basmati rice so it’s a personal preference but there are so many other types of rice that work so well when making a biryani. If you’ve tried a different type of rice and liked it, let me know in the comments below!
- OH and hey, you can also use a different type of grain altogether. You can try and use couscous to make a butter chicken couscous biryani or maybe even quinoa to make a butter chicken quinoa biryani… or any other grain you like.
- You can also sprinkle just a little kewra water or rose water (or both) on top of the complete assembled biryani in Step 7 for a rich, deep taste and lovely aroma. I prefer the natural aroma of this dish though so I skip out on doing this but it’s a suggestion ❤.
- A small variation also is to just have the marinated cooked chicken as it is, as maybe a snack, or appetizer or as a quick main meal along with some plain rice (with Indian pickle on the side) or maybe even with some biryani rice or butter garlic naan. The cooked chicken just tastes sooo good!
- You can also just go ahead and have the butter chicken curry with steamed rice, biryani rice or naan. It’s absolutely scrumptious! For more details, visit our butter chicken recipe!
- In this recipe, you can increase or decrease the amount of butter chicken or biryani rice used to make the butter chicken biryani too. I’ve given a butter chicken to biryani rice ratio that I feel is best but you don’t necessarily have to agree 😉. You can make it the way I’ve given here first and then go ahead and increase or decrease the butter chicken or biryani rice according to your preference the next time you cook this recipe!
Nutrition (per serving)
The nutritional information given here is only an estimate.
Please read our full Nutrition Information Disclaimer to learn more.Did you make this recipe?
I adore going through your creations! Tag us @thebutteryfairytale and hashtag it #thebutteryfairytale on Instagram.
Just made this! Butter chicken served with biryani is a combination that can’t be beaten. Just the sound of this recipe pulled me in, and boy it is a delight. The butter chicken gravy is so so buttery and saucy and the biryani is so rich and delicious. Everything about this recipe just works well. Gonna keep this recipe in mind for sure!